How a Bug in Chinese Software Helped Revive an Ancient Ultrasound Machine: Flashing an SSD for a Good Cause
A medical technician's adventure in flashing SSD firmware to clone serial numbers, tricking a Toshiba Aplio 500 ultrasound machine into accepting replacement drives — and discovering that a quirky bug in Chinese flashing software was the key to success.
As fate would have it, for the past 1.5 years I've been serving my alternative civil service duty working as a medical equipment technician. The work is wildly interesting and engaging, especially if you're keen on reverse engineering. But there's never enough time or energy left for anything creative worth writing about. This time, though, the stars aligned and I get to kill two birds with one stone: content and an instruction guide for my colleagues in the IT department.
Or even three birds — someone out there might find instructions for replacing drives in a Toshiba Aplio 500 useful.
Disclaimer
Naturally, everything described below you do at your own risk. Beyond the basic risk of bricking a working drive, you also risk your data even after a successful reflash. Nobody guarantees how a modified drive will behave long-term. Keep this in mind, proceed carefully, and may backups be with you!
Why Flash an SSD at All? Choosing the Right Drive
At first glance, flashing an SSD sounds as absurd as flashing a soldering iron. However, setting philosophy aside, there aren't that many reasons to do it:
- You have a working SSD and need to change its serial numbers
- You have a broken SSD and are fighting (perhaps in vain) for its life
In this article we'll be working with an SMI controller, though the described experience can be extrapolated to Phison controllers as well.
Why Phison and SMI? The answer is simple — flashing software (leaked factory tools) is most widely available for these controllers. I'm not claiming it doesn't exist for others at all, just that it would be a shame to deliberately buy an SSD for reflashing only to discover there's nothing to flash it with...
The selection algorithm is extremely simple:
- Search retail for 3-5 mid-range models, filtering out junk like Radeon SSDs (which naturally have nothing to do with AMD) and other KingSpec-tier stuff
- For each one, google the controller+memory combination; ideally find recovery cases for that specific model
The search leads to one site: usbdev.ru — the holy grail for working with storage devices, whether flash drives or SSDs. I recommend checking it out even if you don't need to flash anything. I suspect not everyone has heard of a flashed USB drive that identifies as a USB-ODD, with data stored in flash memory in .iso format.
- If among the multitude of flashing tool versions there's one for your controller+memory combination — onward we go
What Are We Working With?
Let's first meet the guest of honor, then we'll go through the required hardware...

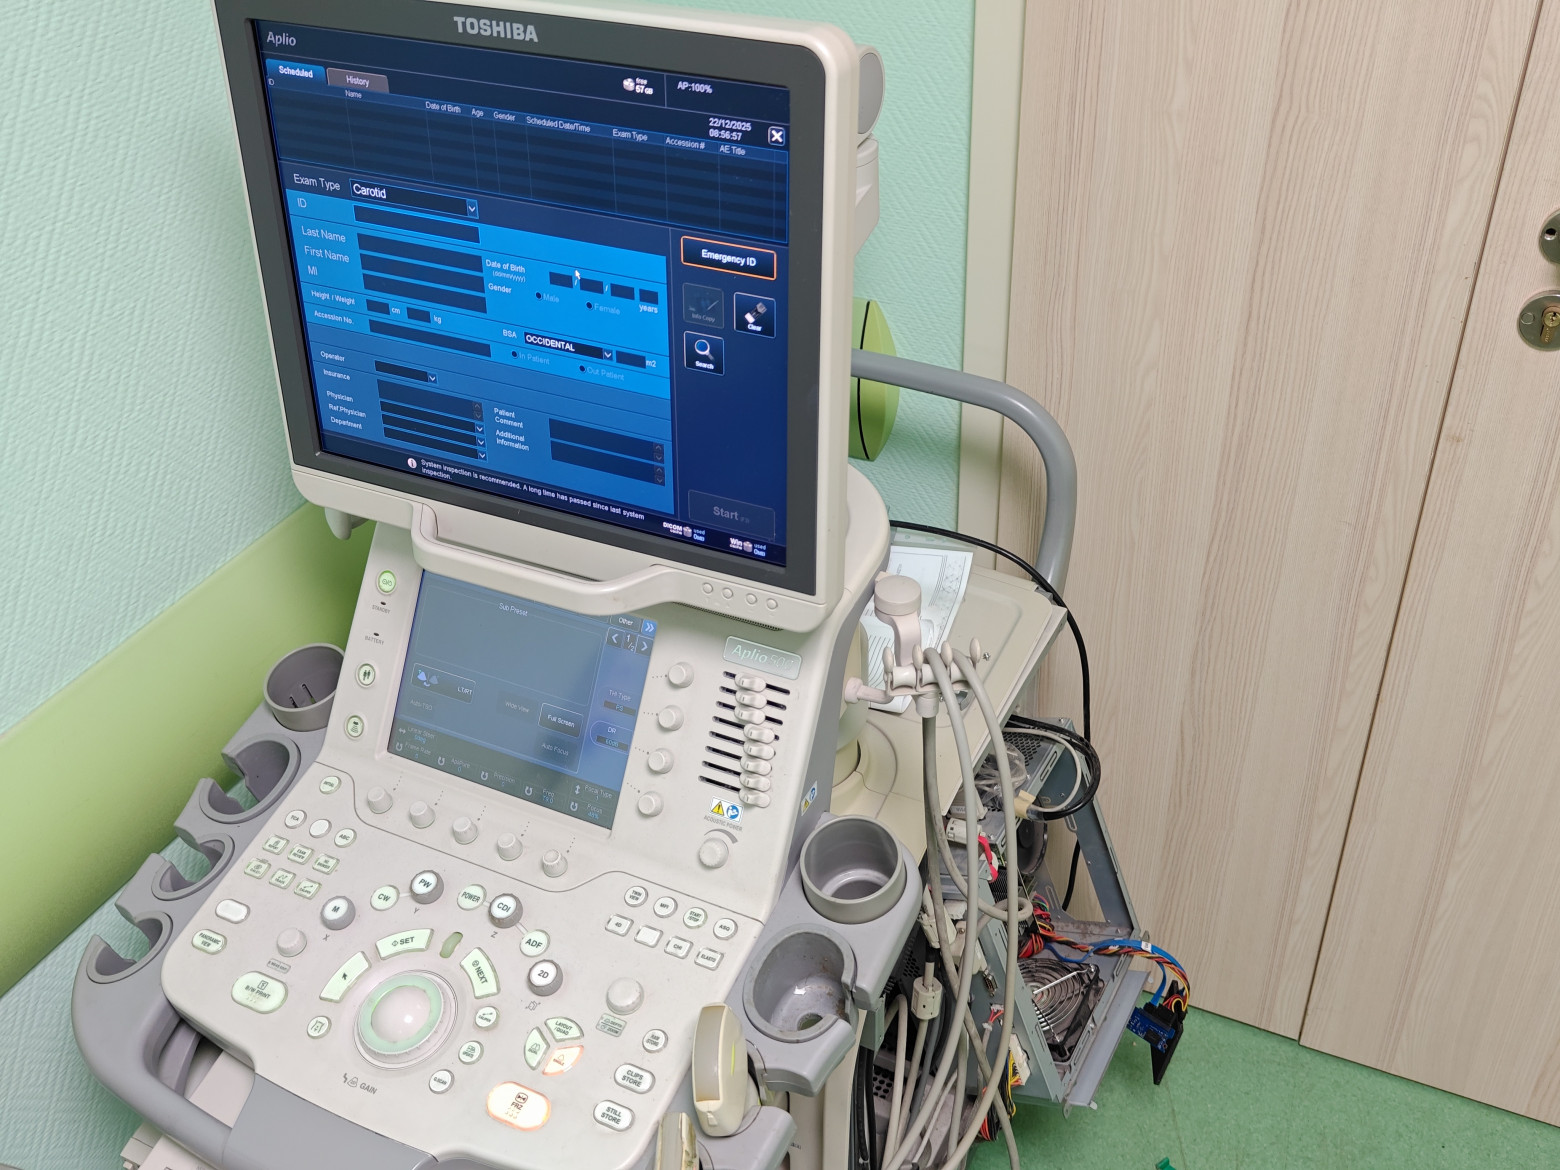
Toshiba Aplio 500
Here it is, with the following specs:
- 19-inch LCD monitor with adjustable vertical and horizontal positioning
- 10-inch touch control panel
- Connectors for 3/4 probes
- Built-in ultrasound unit hard drive — 160 GB
- Workstation hard drive — 250 GB
- Cine loop — 4,090 frames
- Number of transmit-receive channels — over 70,000
- Physical transmit channels — 190
- Scanning depth — up to 32 cm
- Dimensions: 500 (W) x 1400-1700 (H) x 900 (D) mm
- Weight — 140 kg
I deliberately wrote "revive" in the title instead of "resurrect" — the machine is actually working. But what's wrong with it? The ultrasound doctors complain about 5-minute freezes. Working is impossible :/
Both HDDs are physically and morally exhausted and need replacing with SSDs.
The machine first went to the IT department. And only then to me, as a last resort.
You'd think it's simple — install an SSD, do a sector-by-sector clone from the HDD, and you're done. The IT folks thought so too, but ran into harsh reality.
The thing is, after the system boots, the ultrasound shell loads and checks the serial number of the drive where the distribution is installed. If the drive differs from the one the manufacturer/authorized dealer installed, the ultrasound shows an error screen on startup.
A government-funded institution can't afford an authorized service call (for a whole range of reasons), so once again we have to get creative.
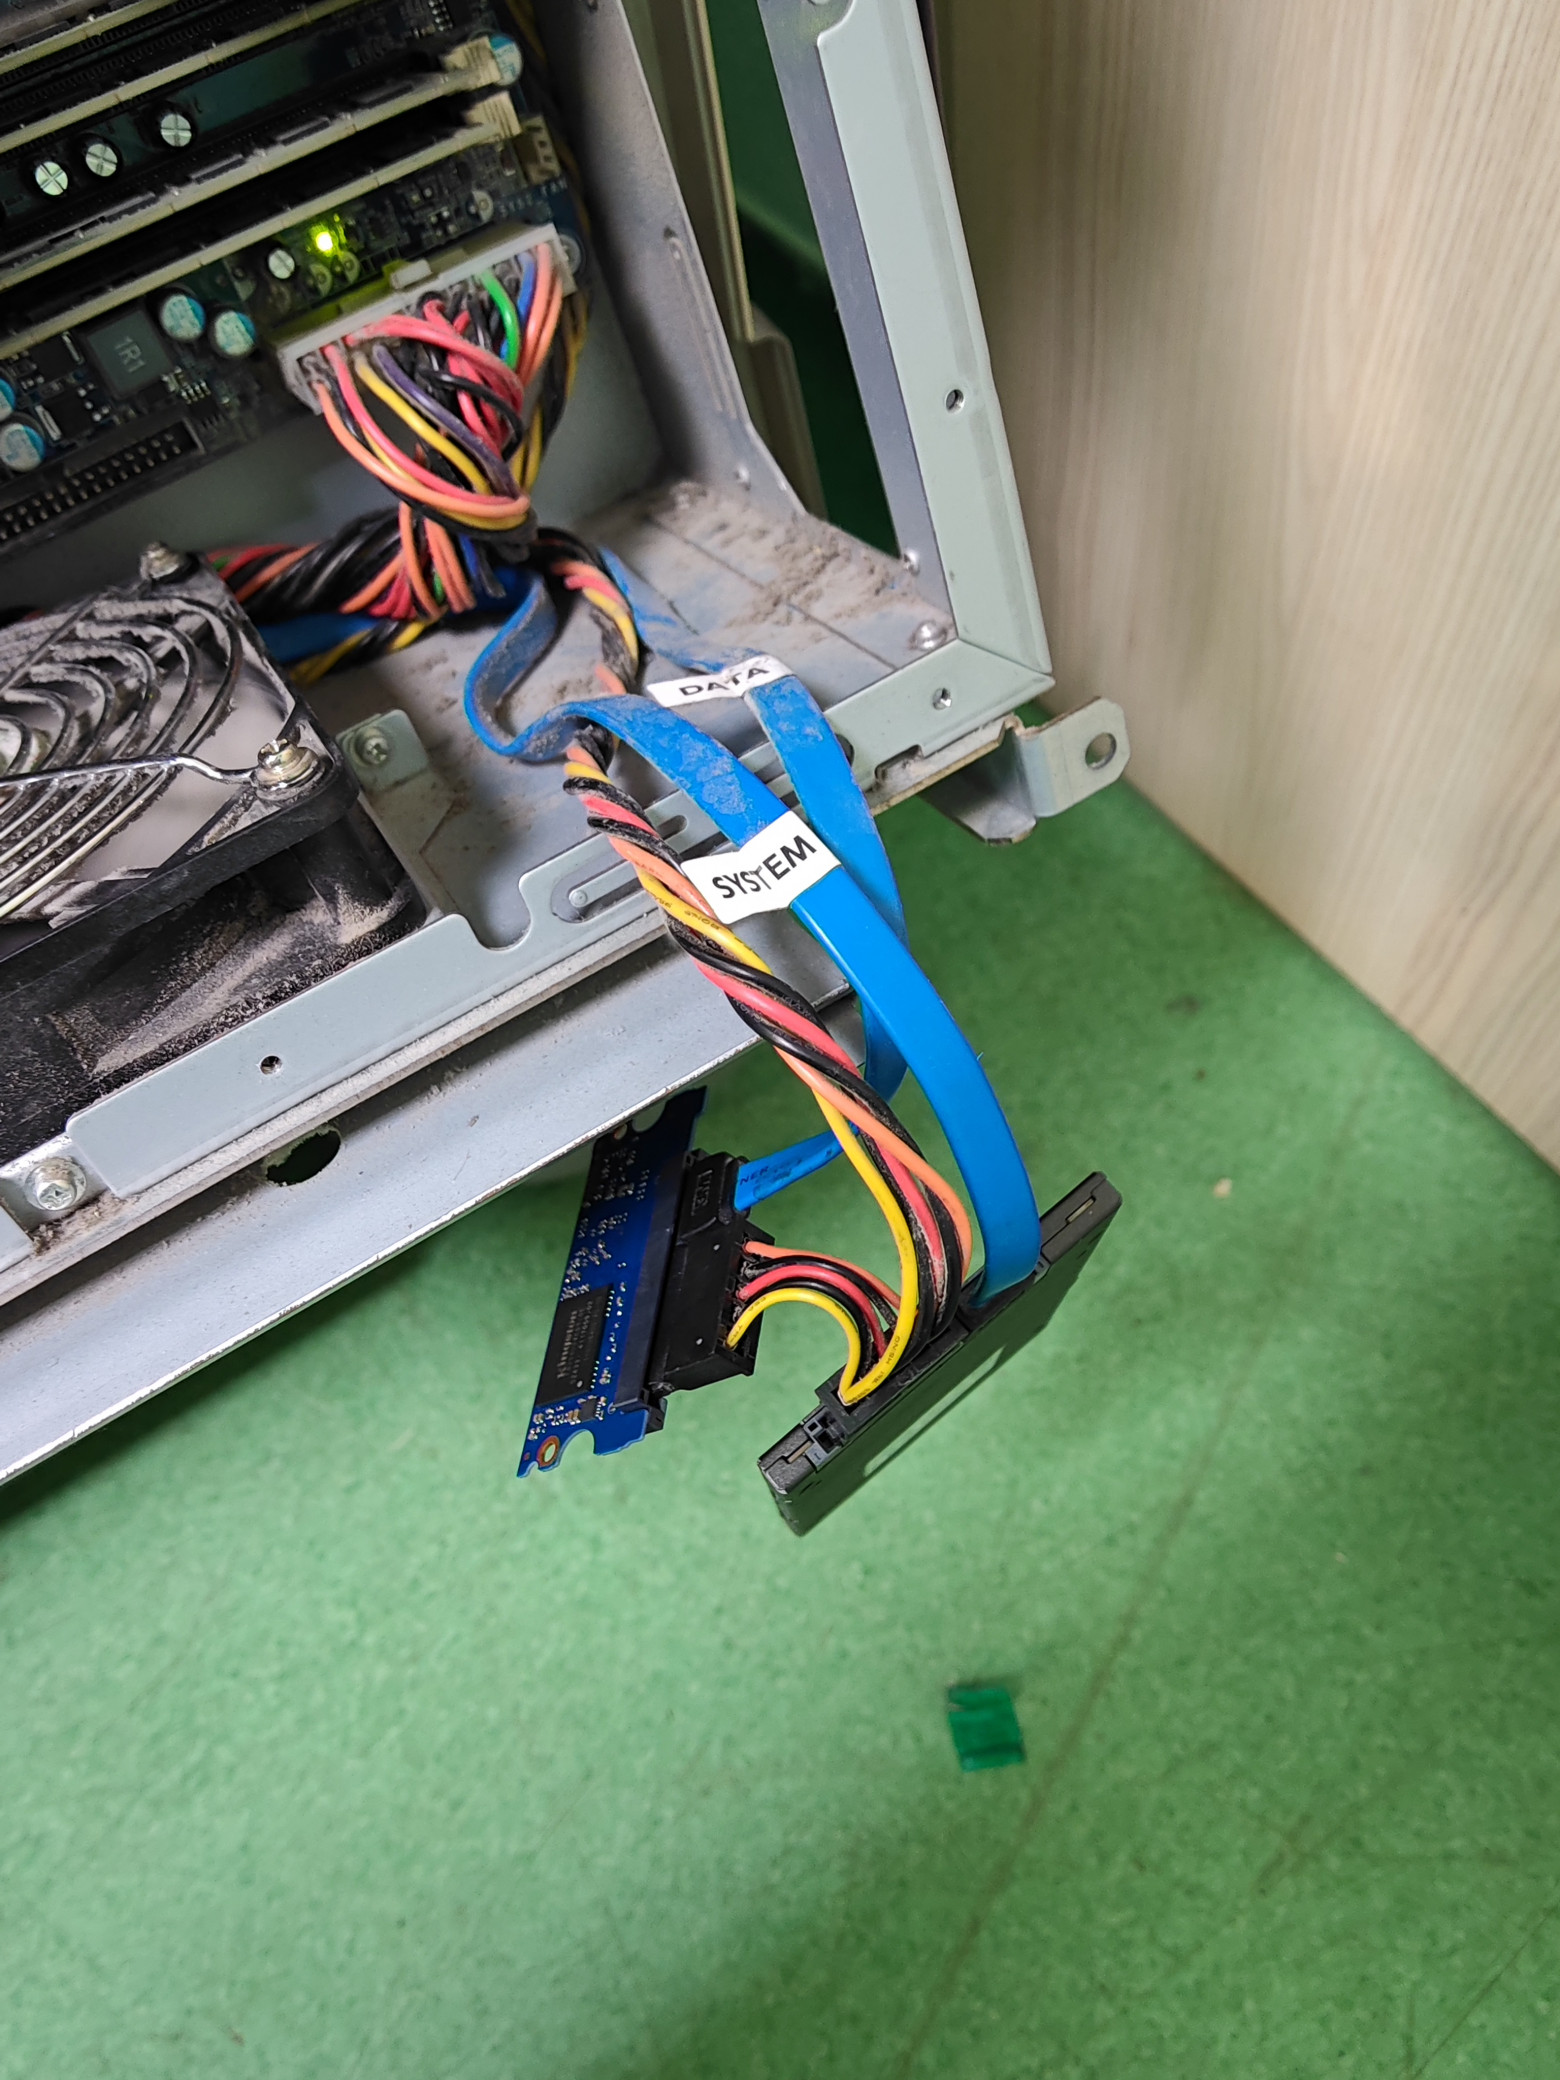
Obviously we need to get to the drives. We strip the plastic shell on the right side and are greeted by...
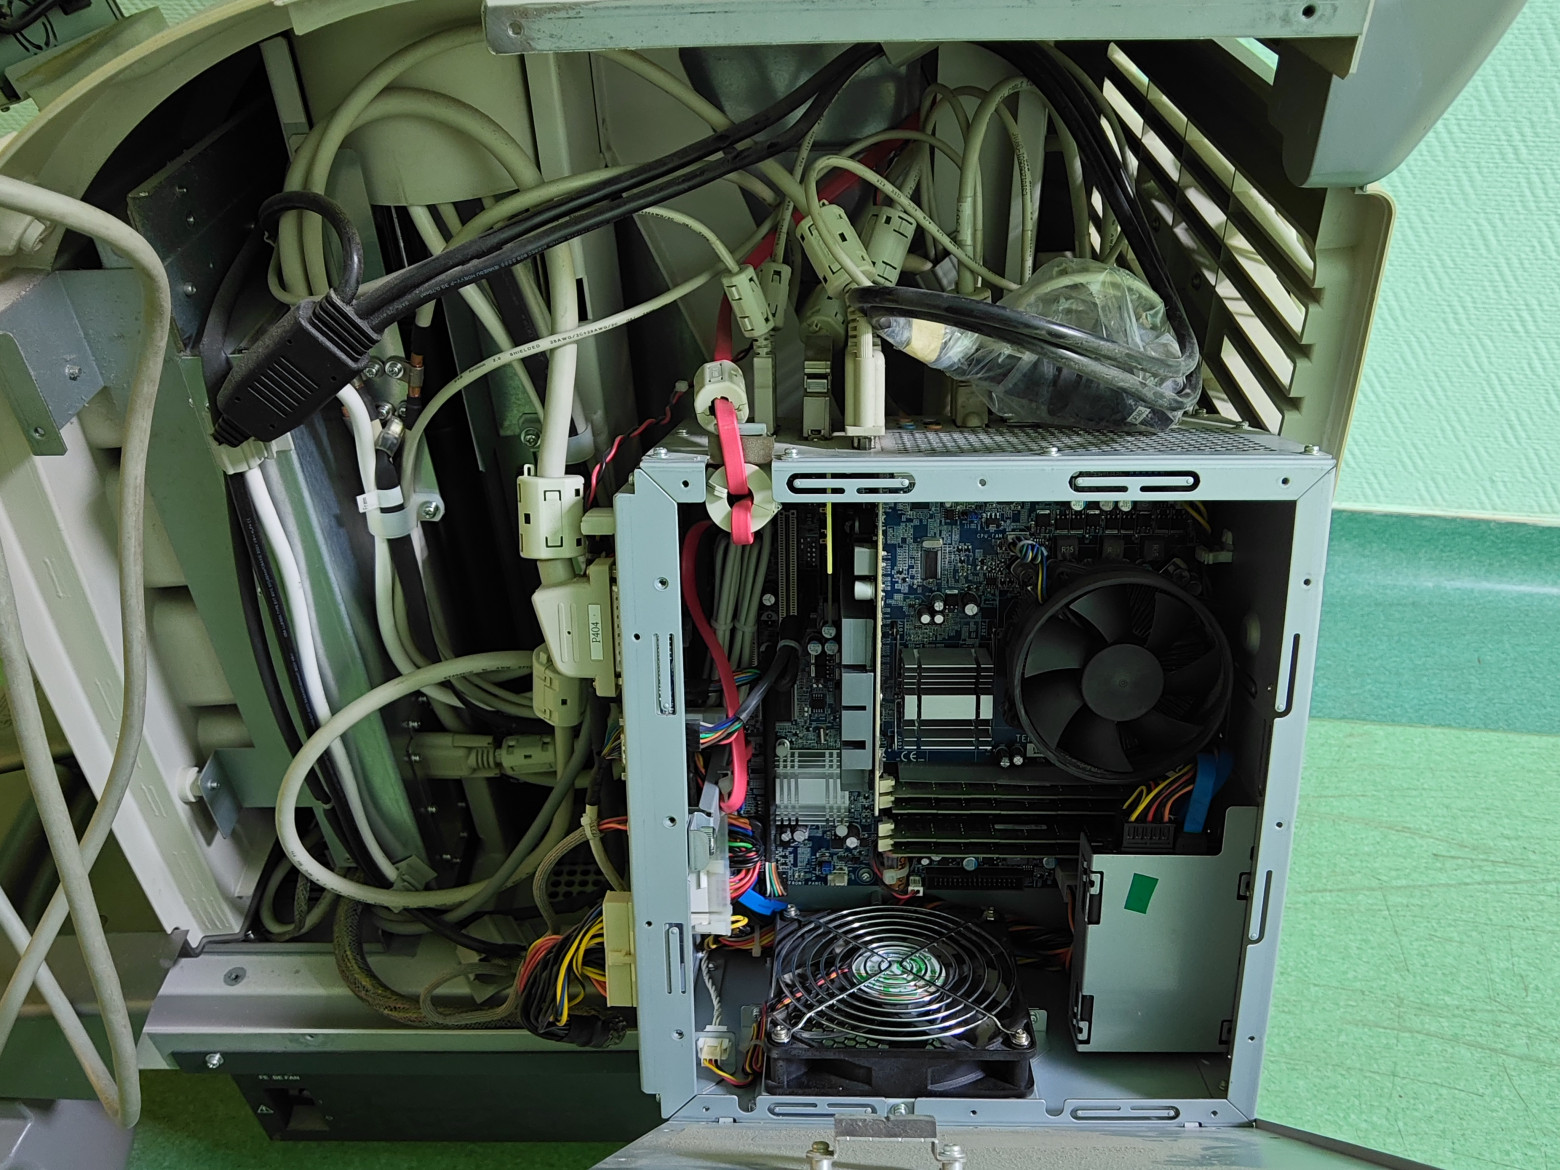
Socket 775 forever
Yes, an ordinary computer. The only unusual parts are the workstation motherboard and a specialized PCI card for the probes. Already guessing what OS is installed?
If you bet on XP — congratulations
P.S. To launch your own process after the shell starts (it blocks any attempts to escape its GUI, including intercepting system calls from standard keys), you need to catch the timing between its startup and winlogon.exe passing through.
There's roughly ~600ms (if the system and shell are on SSD). With a quick press of the standard CTRL+SHIFT+ESC you can catch it, then after the shell starts, use the cursor to focus on Task Manager, and from there I think I don't need to explain further.
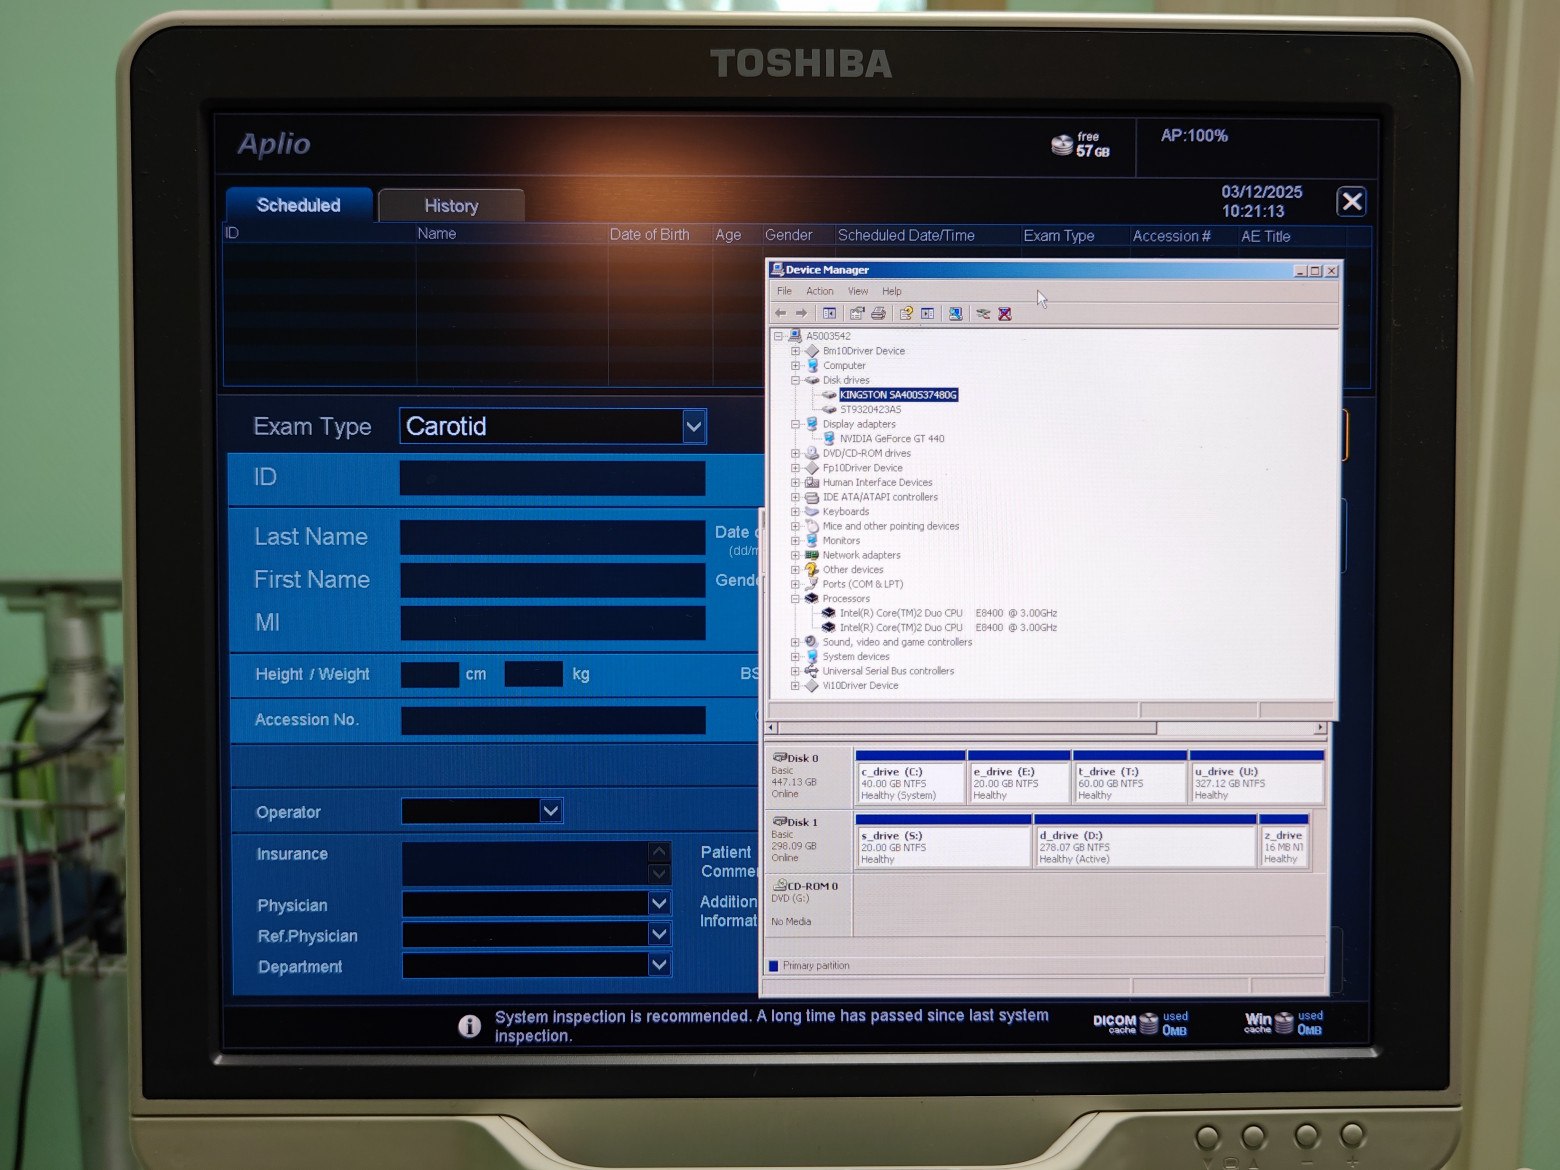
This photo is from the beginning, when only the system was cloned; disk 1 with the distribution remained the original. But that's not enough, so let's move on to examining the SSD.
Even before getting the machine into my hands, I analyzed the retail market using the algorithm above and ordered 2 SSDs for this operation:
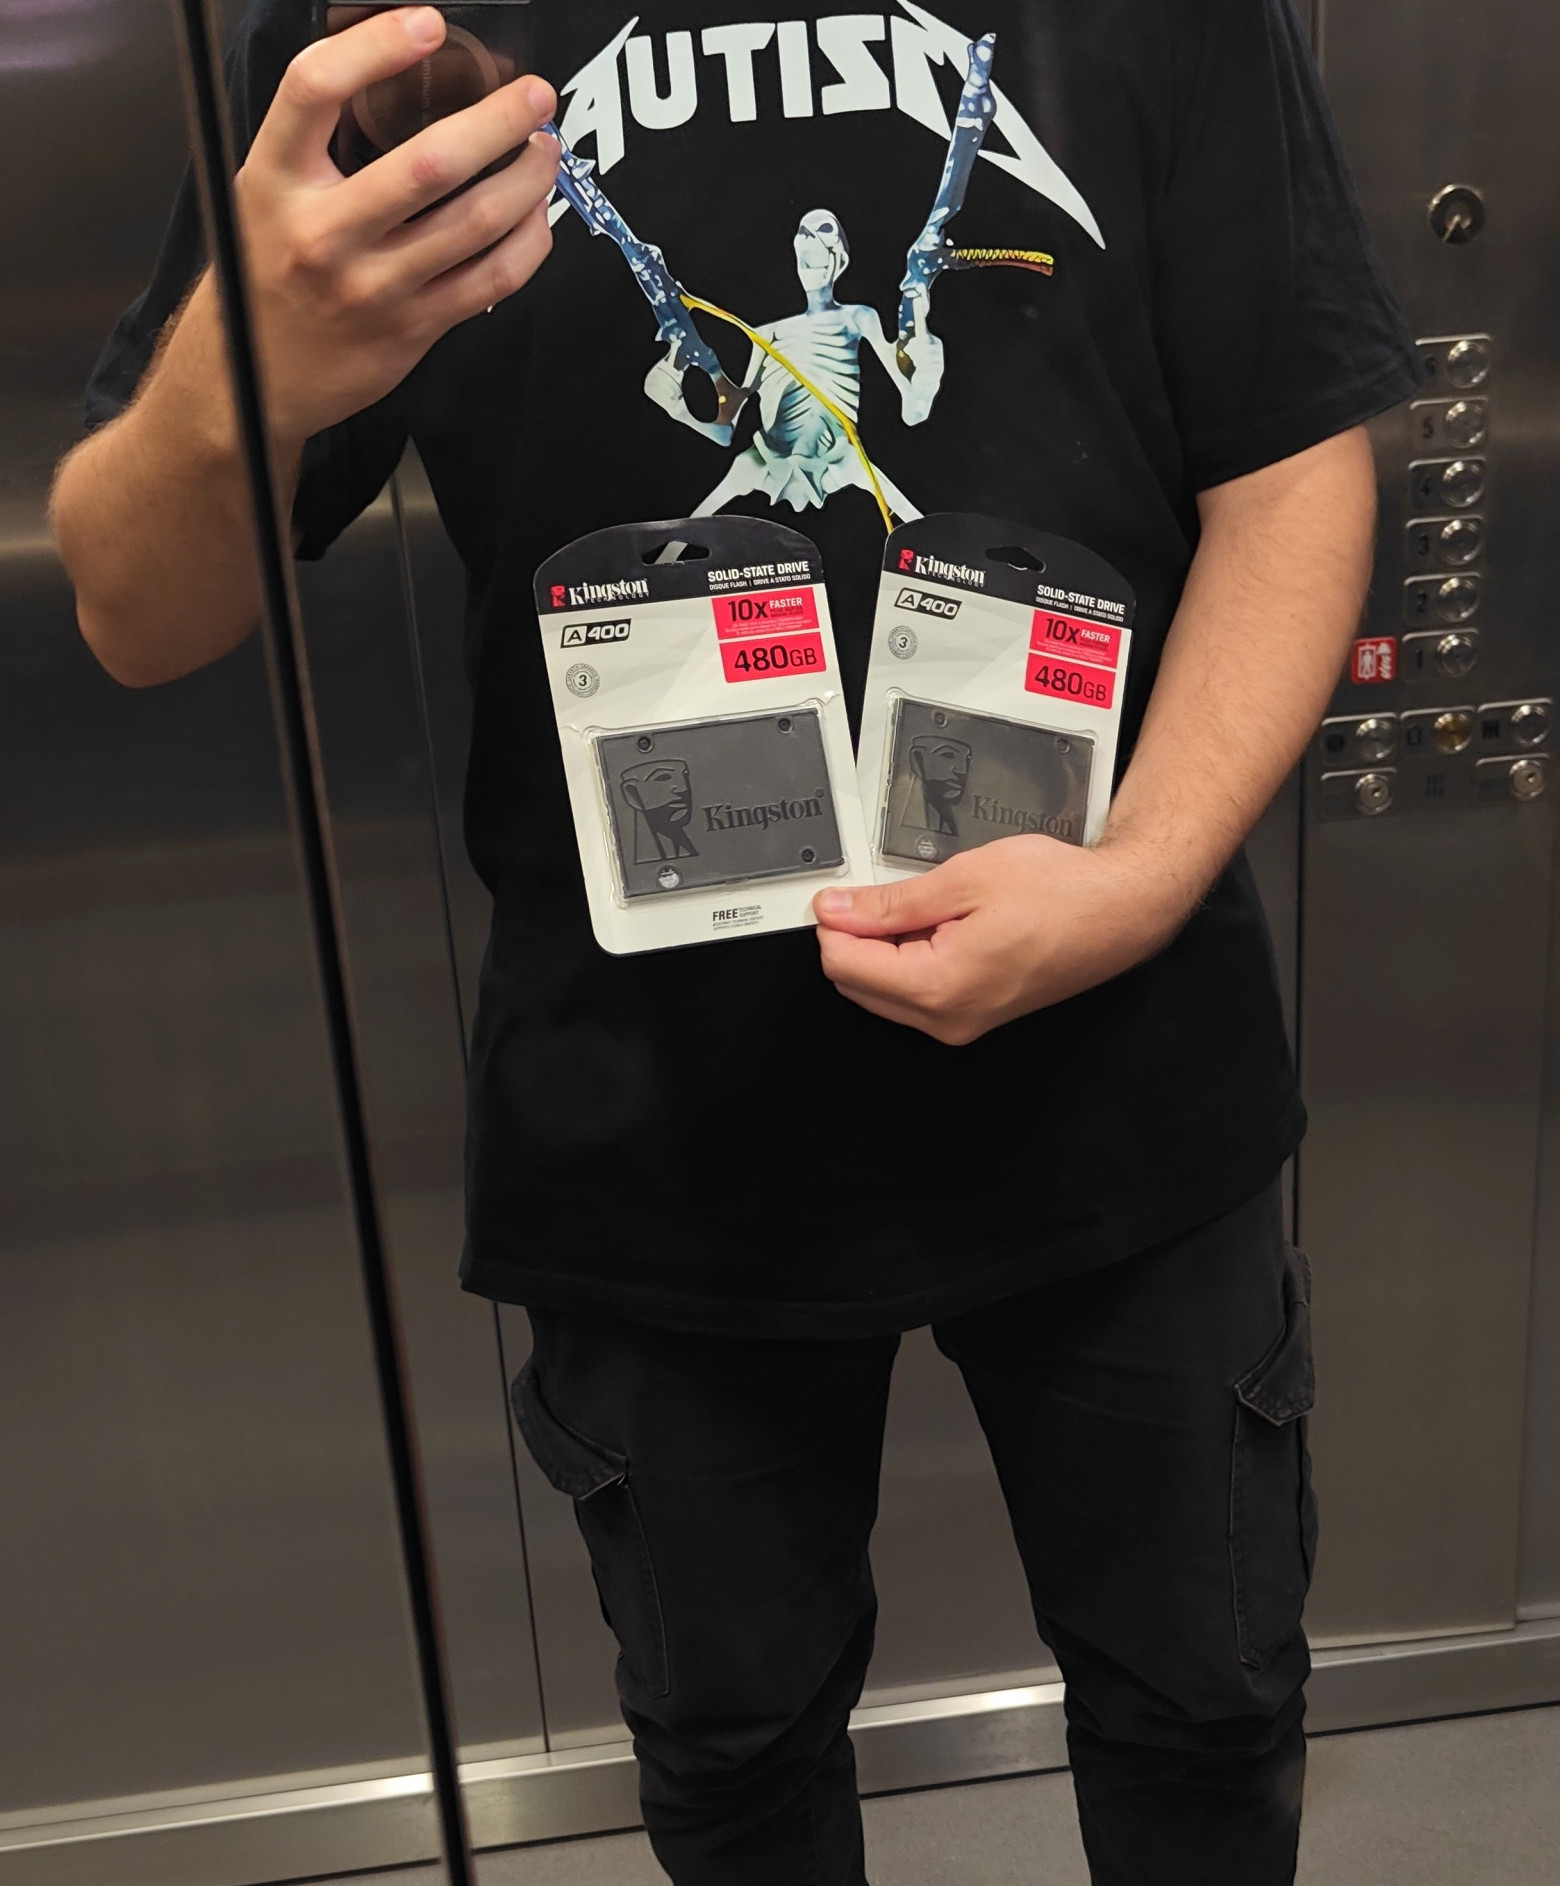
The t-shirt inscription describes this whole endeavor
Yes, the most mainstream A400s, but they're easy to buy and you can find firmware for them. Let's crack them open and inside we find:
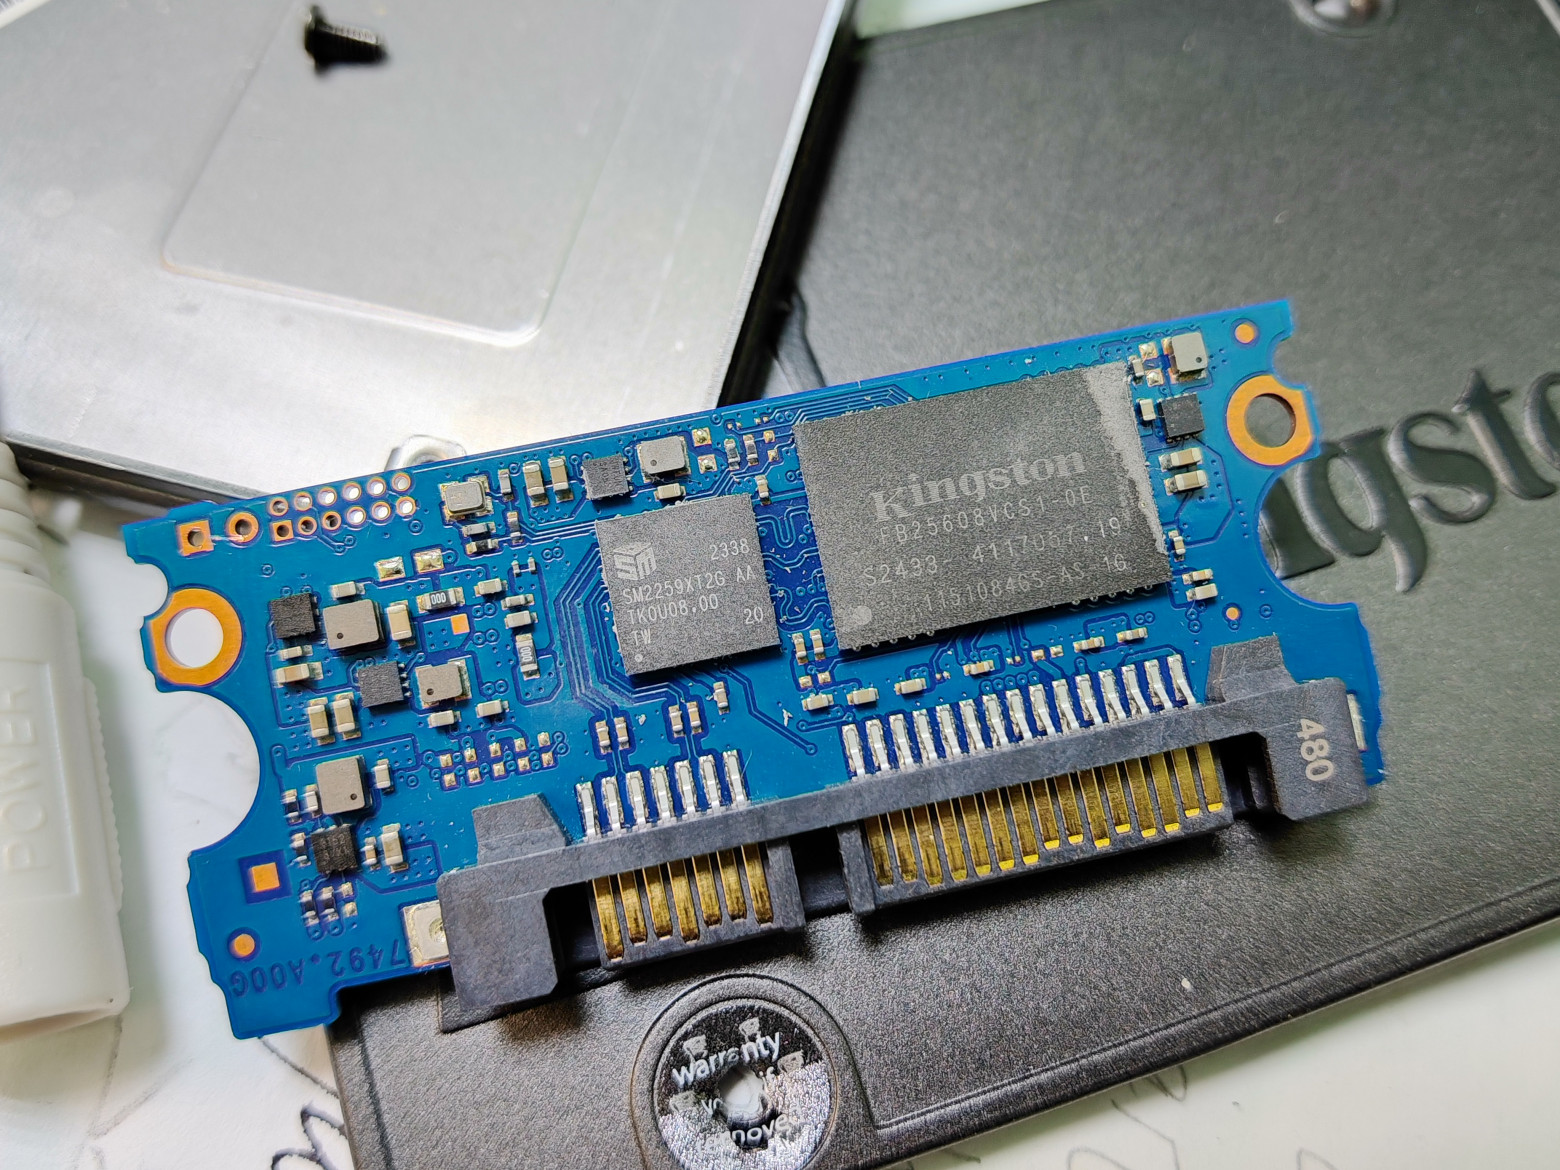
A little stub. Interestingly, even though the case is metal, there's no thermal transfer to it at all...
Controller: Silicon Motion SM2259XT2 + two TLC memory chips FB25608VCS1 (Samsung? At least that's what the flashing tool config calls the memory)
The eagle-eyed among you will notice the contact pads in the upper left corner of the board. With a 2.0mm pitch, 12-pin — I'd guess it's the controller's JTAG. The 2-pin one is the contacts for putting the controller into BootROM mode, but spoiler alert: they won't be needed, and for this specific SSD you don't even need to open the case for flashing!
What You'll Need for the Whole Operation:
A motherboard with two SATA HotPlug ports — to avoid the hassle of rebooting every time, we bring them outside along with power to get something like:
No jokes about molex to SATA please
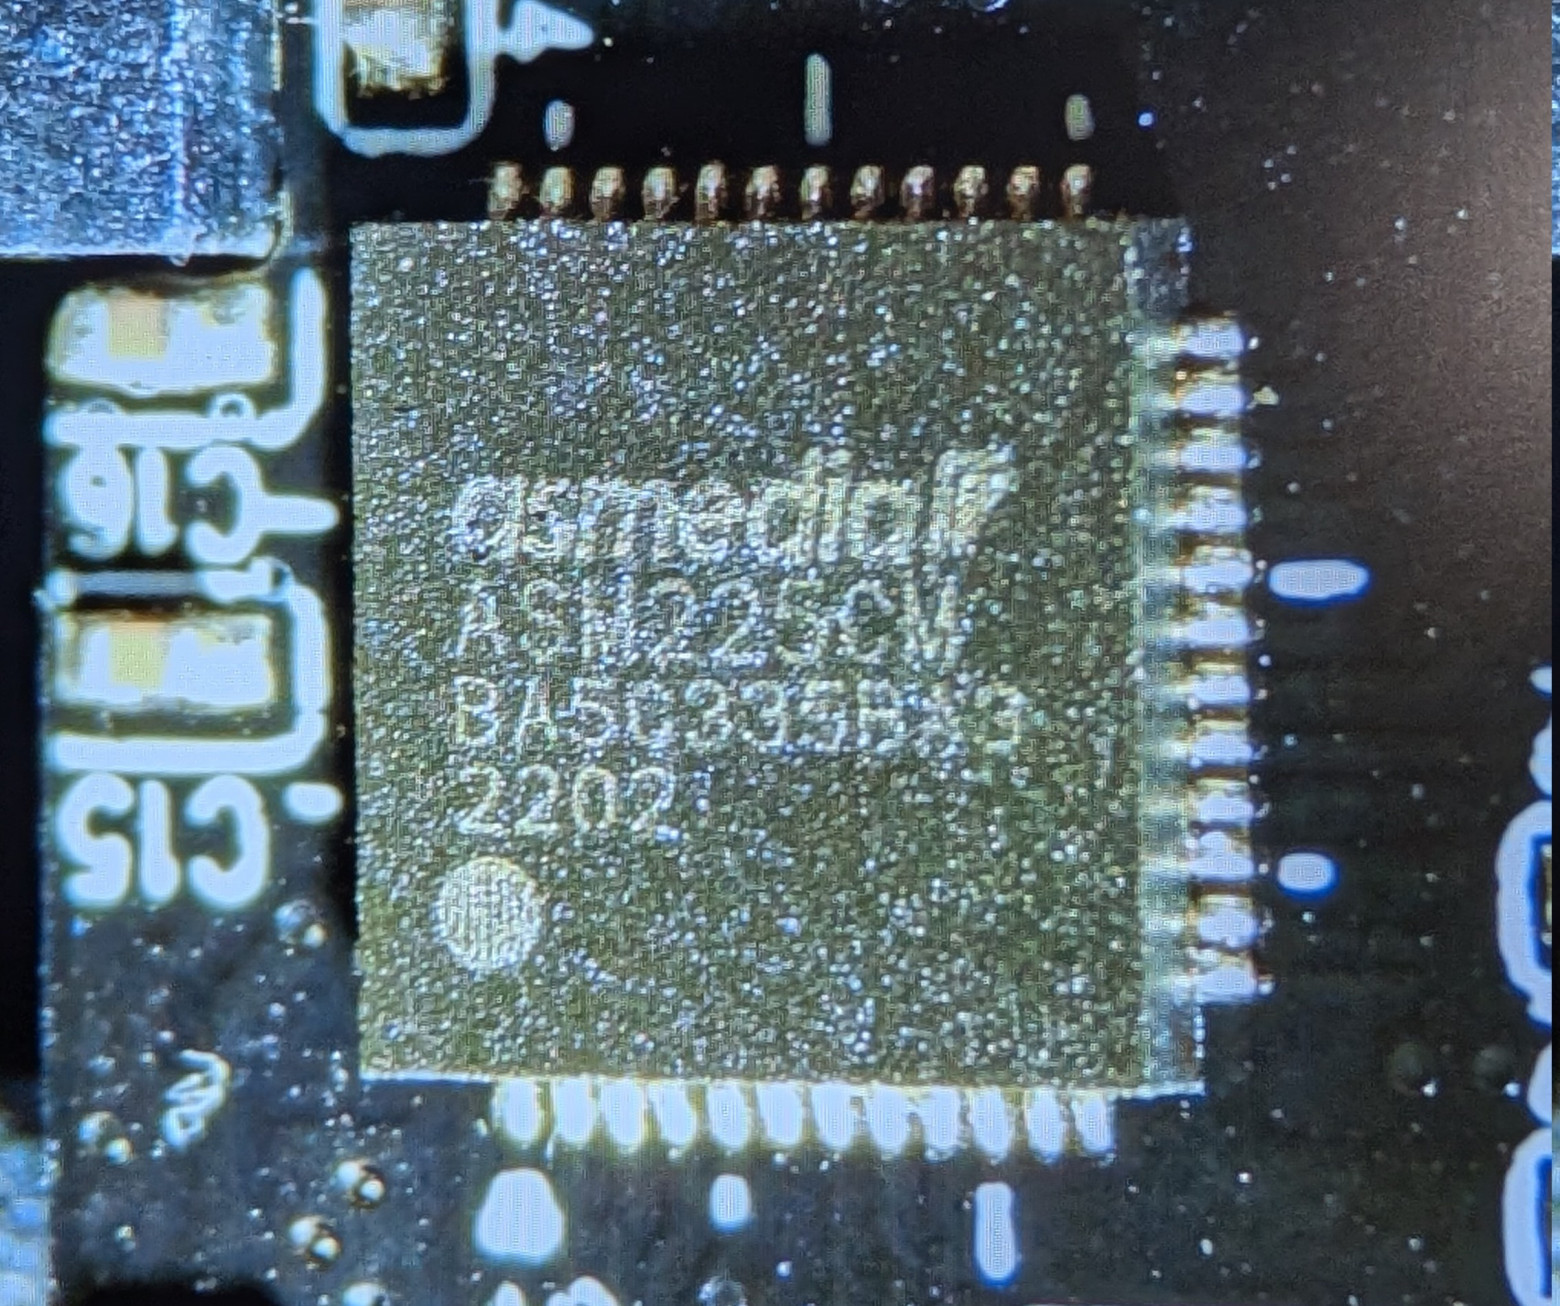
A USB-SATA adapter. I used a DEXP HD303 on the ASM225CM chip — it performed excellently, zero problems throughout all the firmware juggling
And needless to say, we only flash through it?
The adapter shown above
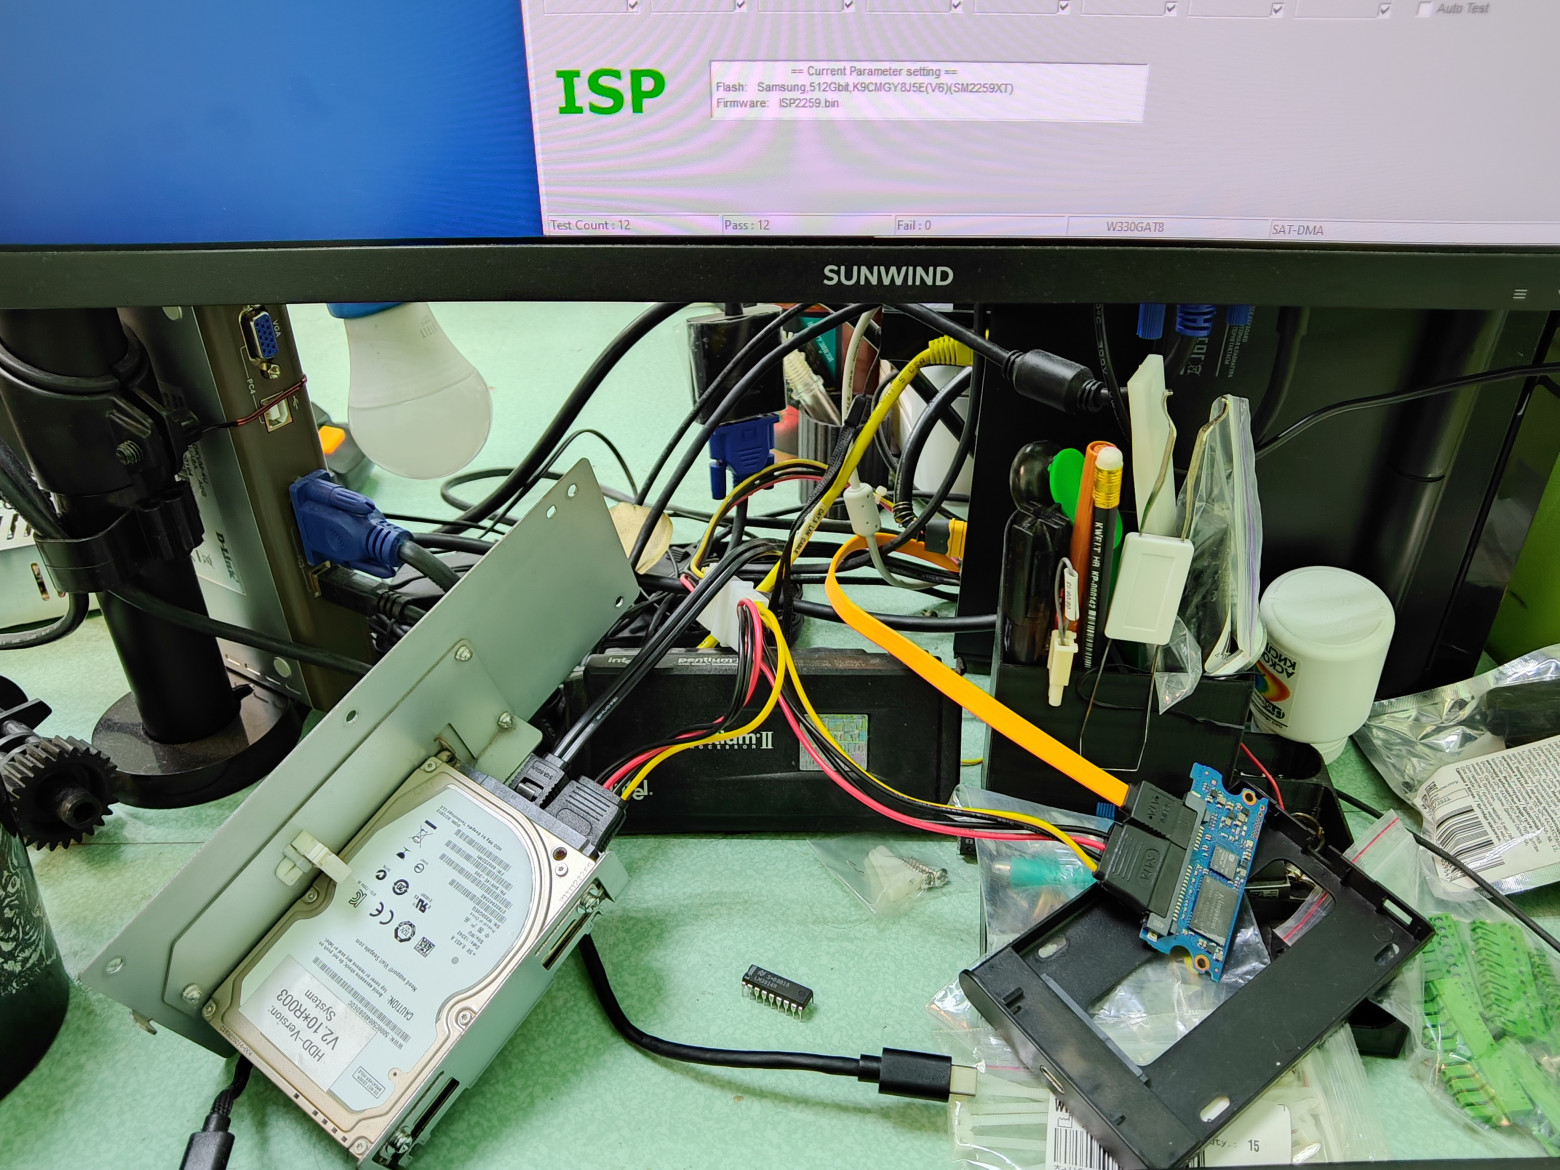
The flashing tool itself. Here you can be clever: download any recent one for your controller version, hit Scan Drive and read out the firmware version:
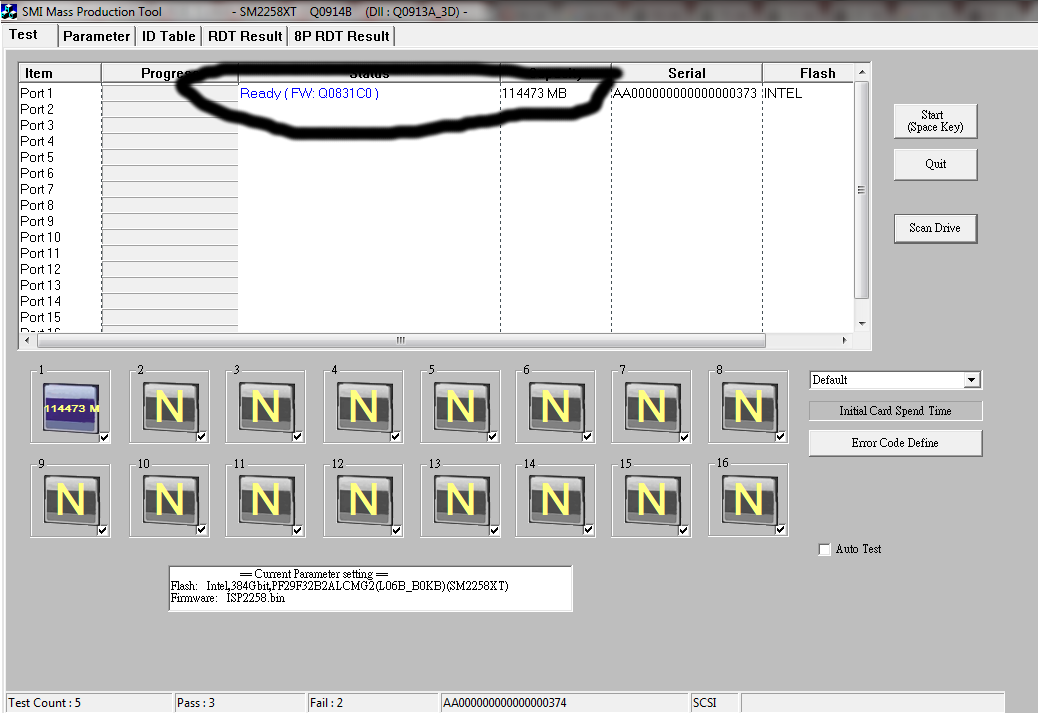
If you're lucky
Then search for the necessary flashing package by firmware version. For a test, you can flash without changing parameters; if everything's OK — we continue:
Open parameters -> Edit config -> Enter the password (listed on the download page) and edit the following parameters:
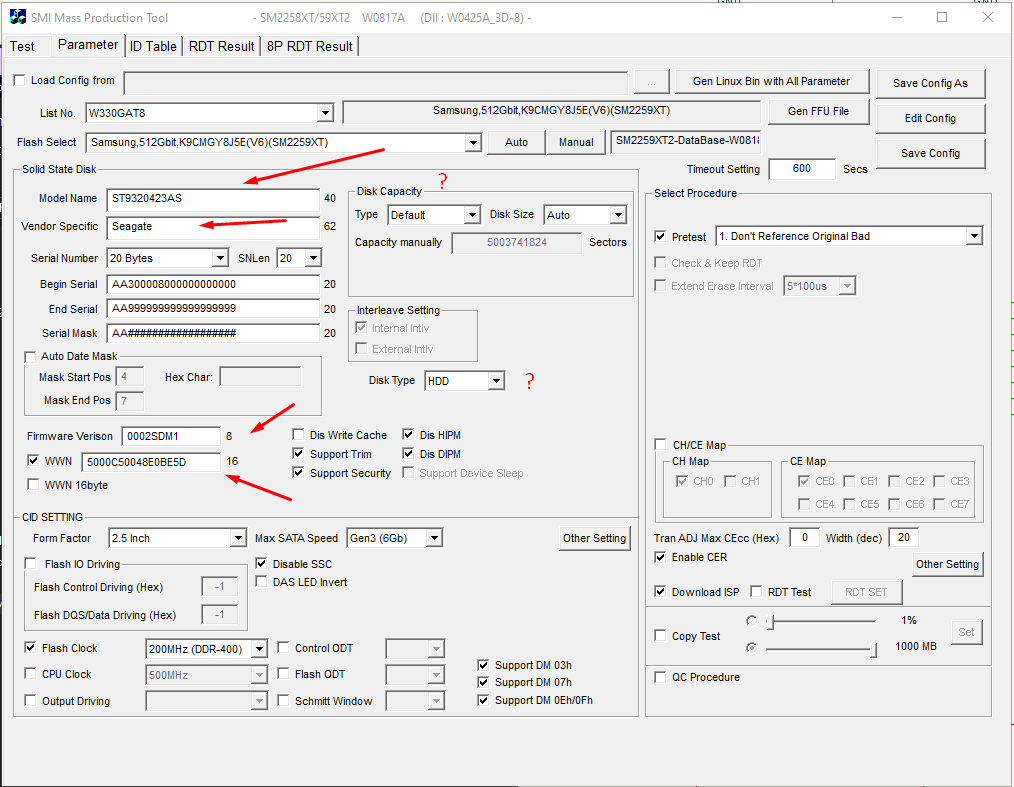
Everything except the serial number and WWN — more on those later
Hit Save Config As -> Save to the flashing tool's root folder. Select our config again.
From here I'll deliberately simplify, since I'll be describing the incorrect sequence of actions anyway — don't step on my rakes!
And here's the problem: the serial number in the program is entered according to a specific mask. No problem — I edit the text config, set the minimum length to 9 bytes, then enter the serial number matching the hard drive as read from Crystal Disk Info.
Flash it, check:
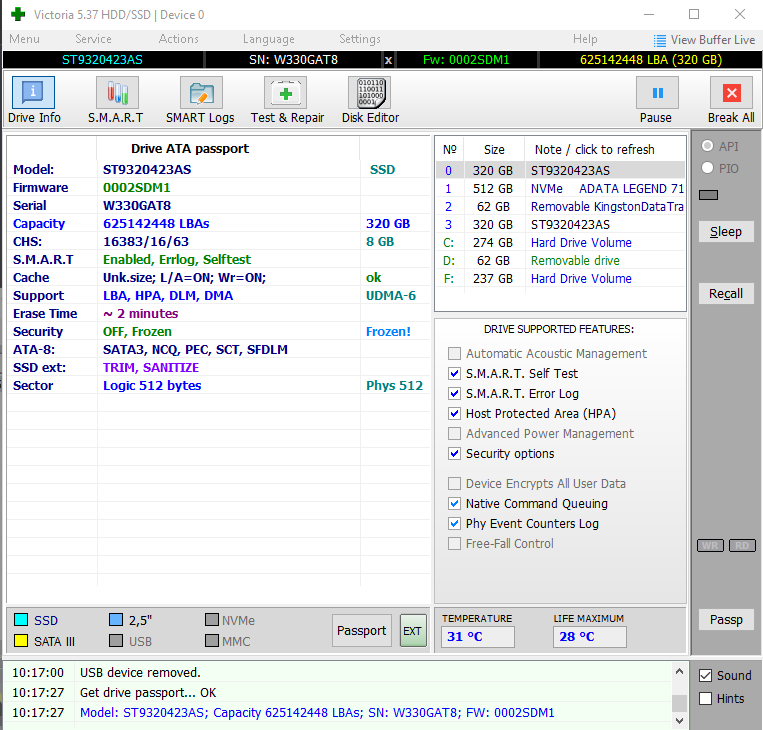
For testing I set the sector count to match the HDD
The passport matches the HDD — practically a full clone. Let's run some tests:
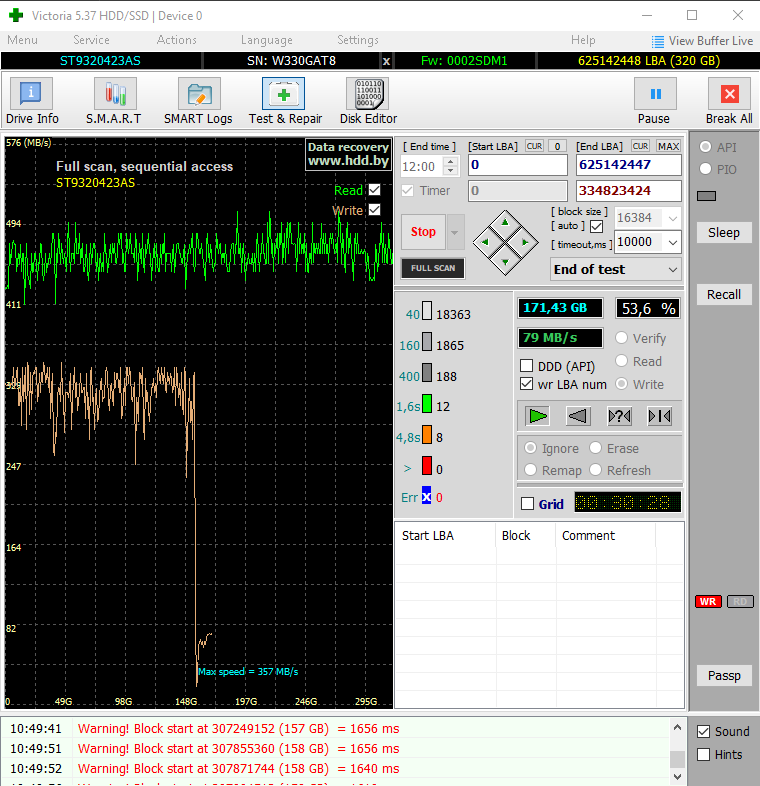
The speed step isn't great, but it writes without errors. I'm sure there are experts out there who know if this is normal or not — I'd appreciate any comments on the topic
The serial number was successfully written, so we can proceed. Clone the system and...
Nothing. The shell still won't start. Dead end?
Not All That Glitters Is Gold
But why? Could the sector count be affecting it?
Changed it, flashed, cloned, checked — still the same...
A day later I came back with a clear head and had an epiphany: what if the GUI diagnostic programs are lying to us?
We google the specs, ATA API, land on Microsoft's website and what do we see:
typedef struct _IDENTIFY_DEVICE_DATA {
  struct {
    USHORT Reserved1 : 1;
    USHORT Retired3 : 1;
    USHORT ResponseIncomplete : 1;
    USHORT Retired2 : 3;
    USHORT FixedDevice : 1;
    USHORT RemovableMedia : 1;
    USHORT Retired1 : 7;
    USHORT DeviceType : 1;
  } GeneralConfiguration;
  USHORT NumCylinders;
  USHORT SpecificConfiguration;
  USHORT NumHeads;
  USHORT Retired1[2];
  USHORT NumSectorsPerTrack;
  USHORT VendorUnique1[3];
  UCHAR  SerialNumber[20];
  USHORT Retired2[2];
  USHORT Obsolete1;
  UCHAR  FirmwareRevision[8];
  UCHAR  ModelNumber[40];
  UCHAR  MaximumBlockTransfer;
  UCHAR  VendorUnique2;
In the device data structure, our cornerstone SerialNumber gets 20 bytes. Excellent — but what does the data actually look like? We open PowerShell and whip up a simple script:
Get-Disk | ForEach-Object {
    $diskNumber = $_.Number
    $wmi = Get-CimInstance Win32_DiskDrive |
           Where-Object DeviceID -eq "\\.\PHYSICALDRIVE$diskNumber"

    # Get strings
    $serial = $wmi.SerialNumber
    $unique = $_.UniqueId

    # Convert strings to bytes then to hex
    $serialHex = if ($serial) {
        ($serial.ToCharArray() | ForEach-Object {
            "{0:X2}" -f [byte][char]$_
        }) -join " "
    } else { "" }

    $uniqueHex = if ($unique) {
        ($unique.ToCharArray() | ForEach-Object {
            "{0:X2}" -f [byte][char]$_
        }) -join " "
    } else { "" }

    [PSCustomObject]@{
        Disk      = $diskNumber
        Serial    = $serial
        SerialHex = $serialHex
        UniqueId  = $unique
        UniqueHex = $uniqueHex
    }
}
We run it and what do we see?
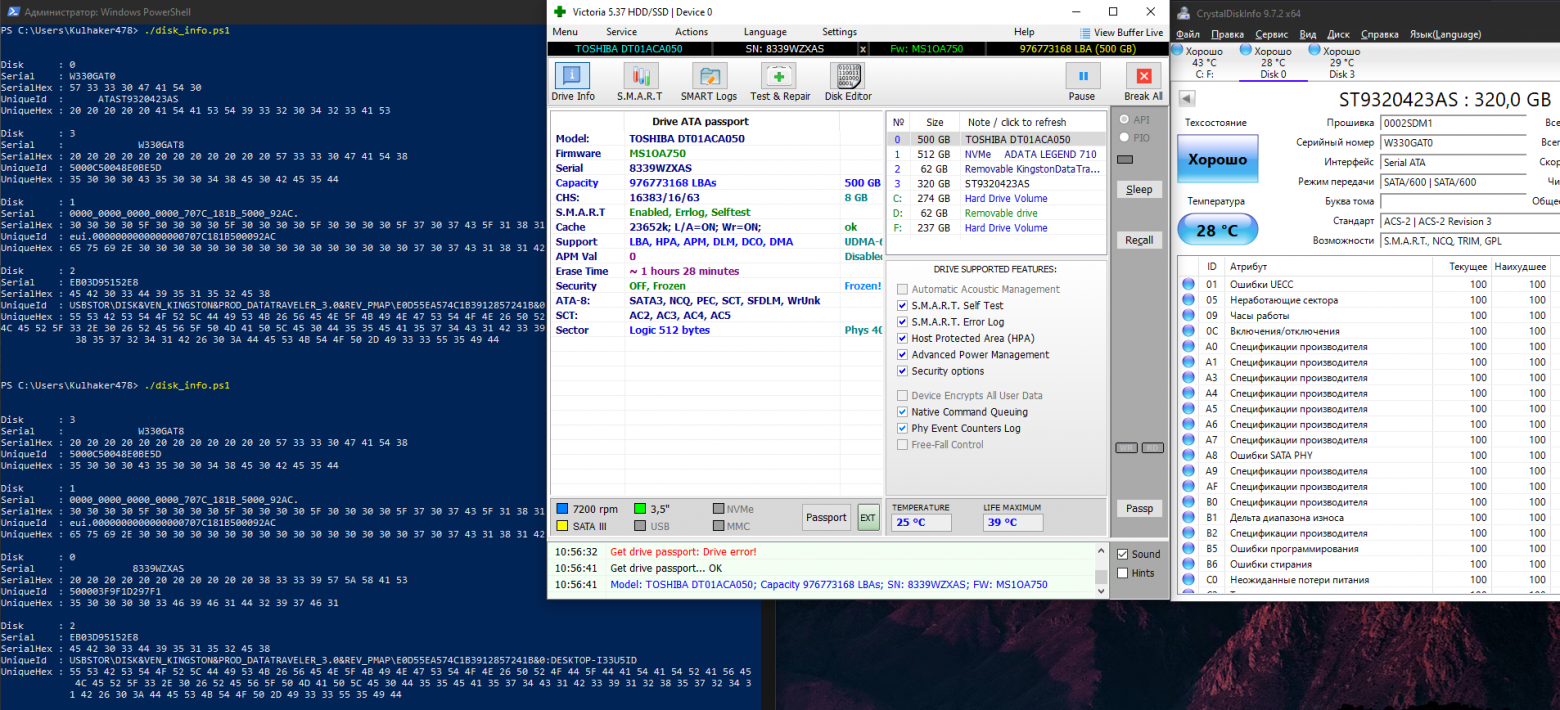
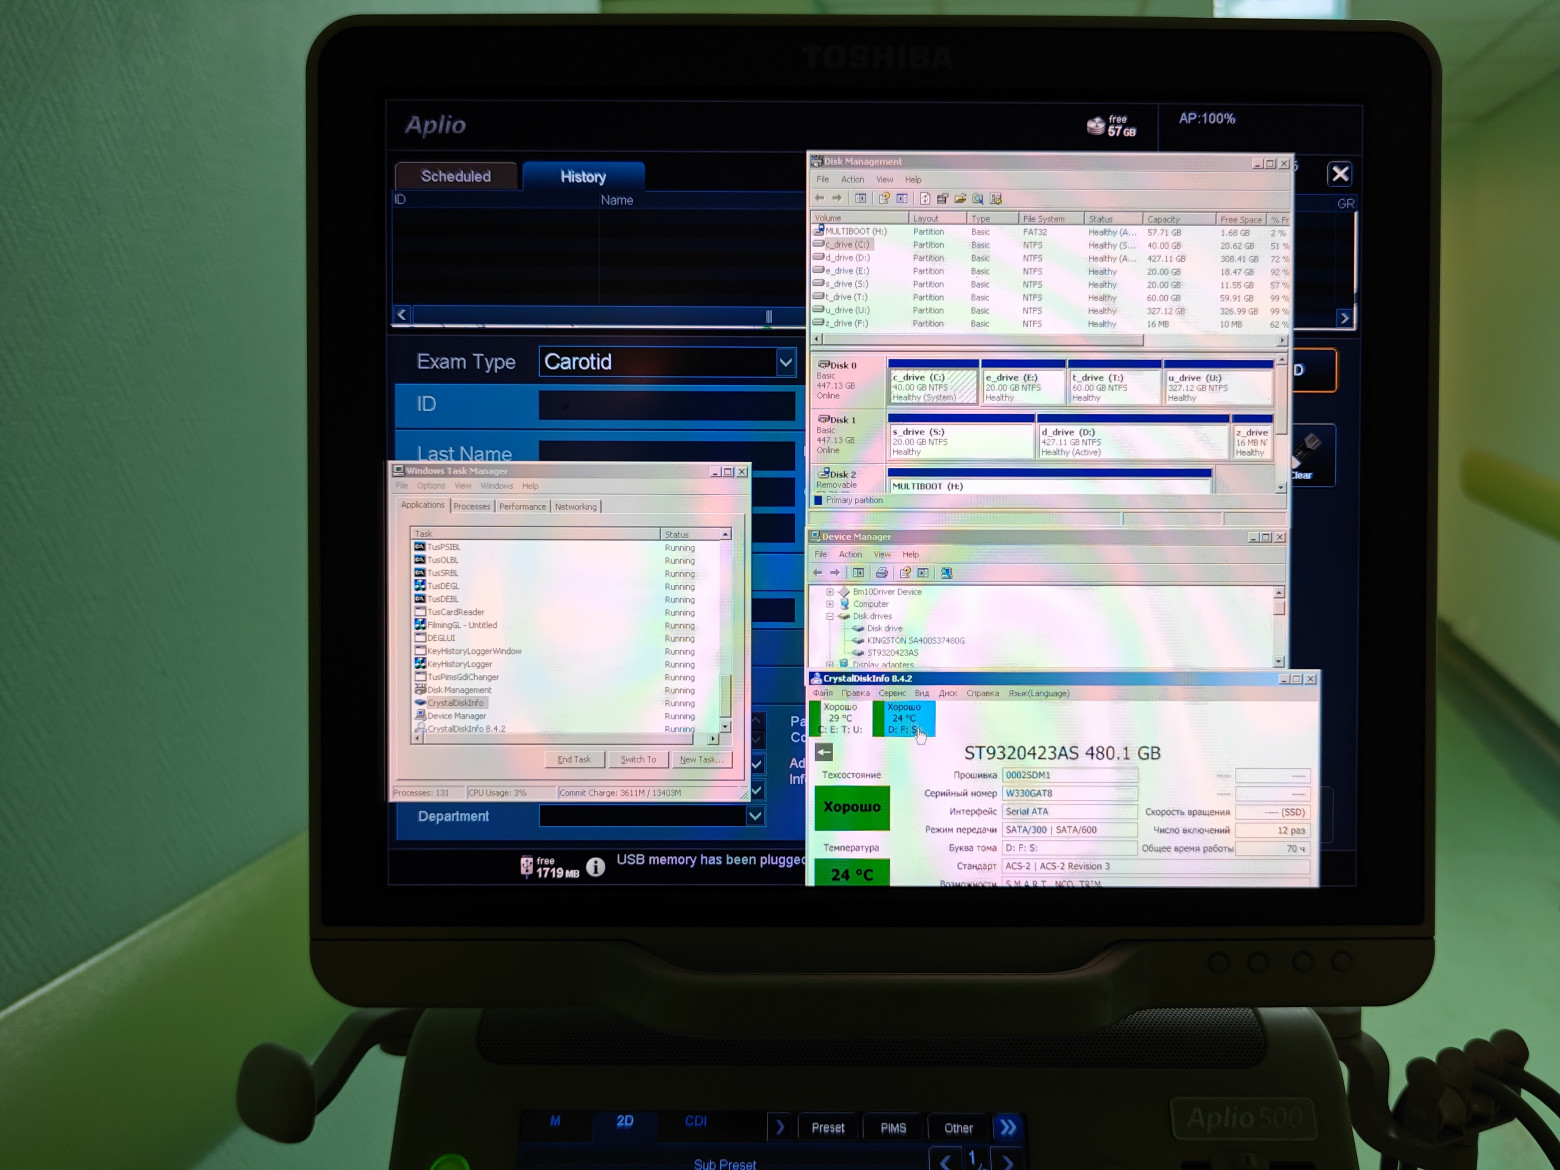
Trust no one
Disk 0 is our SSD, disk 3 is the original ultrasound HDD. Seemingly the same serial number, but there's a nuance.
Next, out of curiosity, I connected another random 500GB drive and checked its serial number — it also had spaces (ASCII code 0x20) and the same length. Well, apparently that's the standard.
Back to our flashing tool:
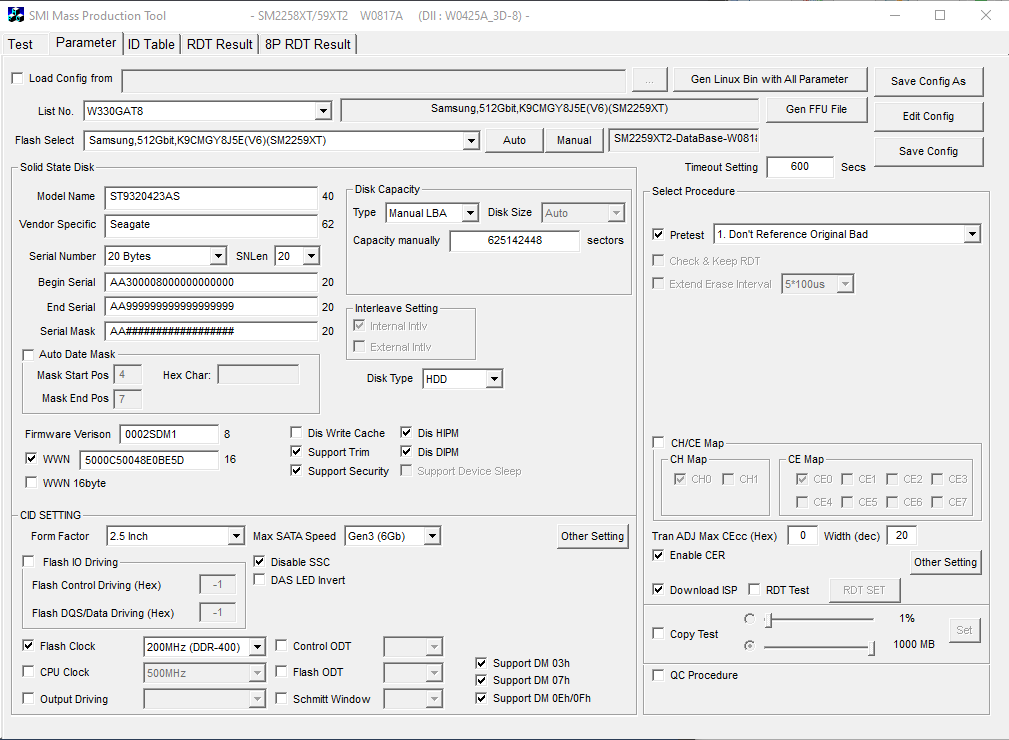
The amount of nerves this thing drained...
We set the length back to 20, and also just in case (even if the ultrasound shell doesn't check it, no harm done) add the WWN (which is the UniqueId) that we obtained above. Then we go to the config.
When you try to put spaces in, the flashing tool silently delights us by stripping them out at the start of flashing:
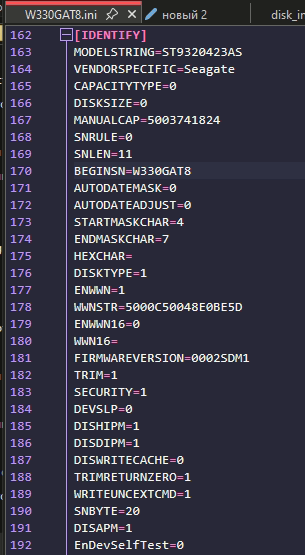
But we'll defeat it
I don't know after how many attempts of trying different characters, but it finally occurred to me to add quotation marks, and as a result:
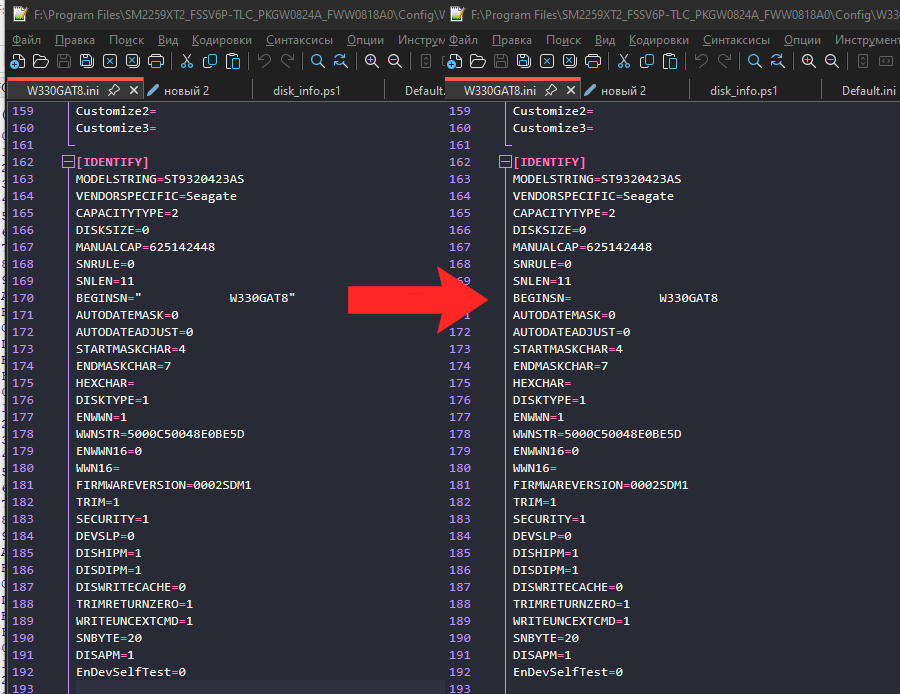
Left: config before flashing starts. Right: after
The flashing tool happily eats the first and last quotation mark characters, leaving the rest of the serial number untouched, and then converts our string with spaces and writes it along with the other data.
Let's verify what's actually there — and it's all looking great:
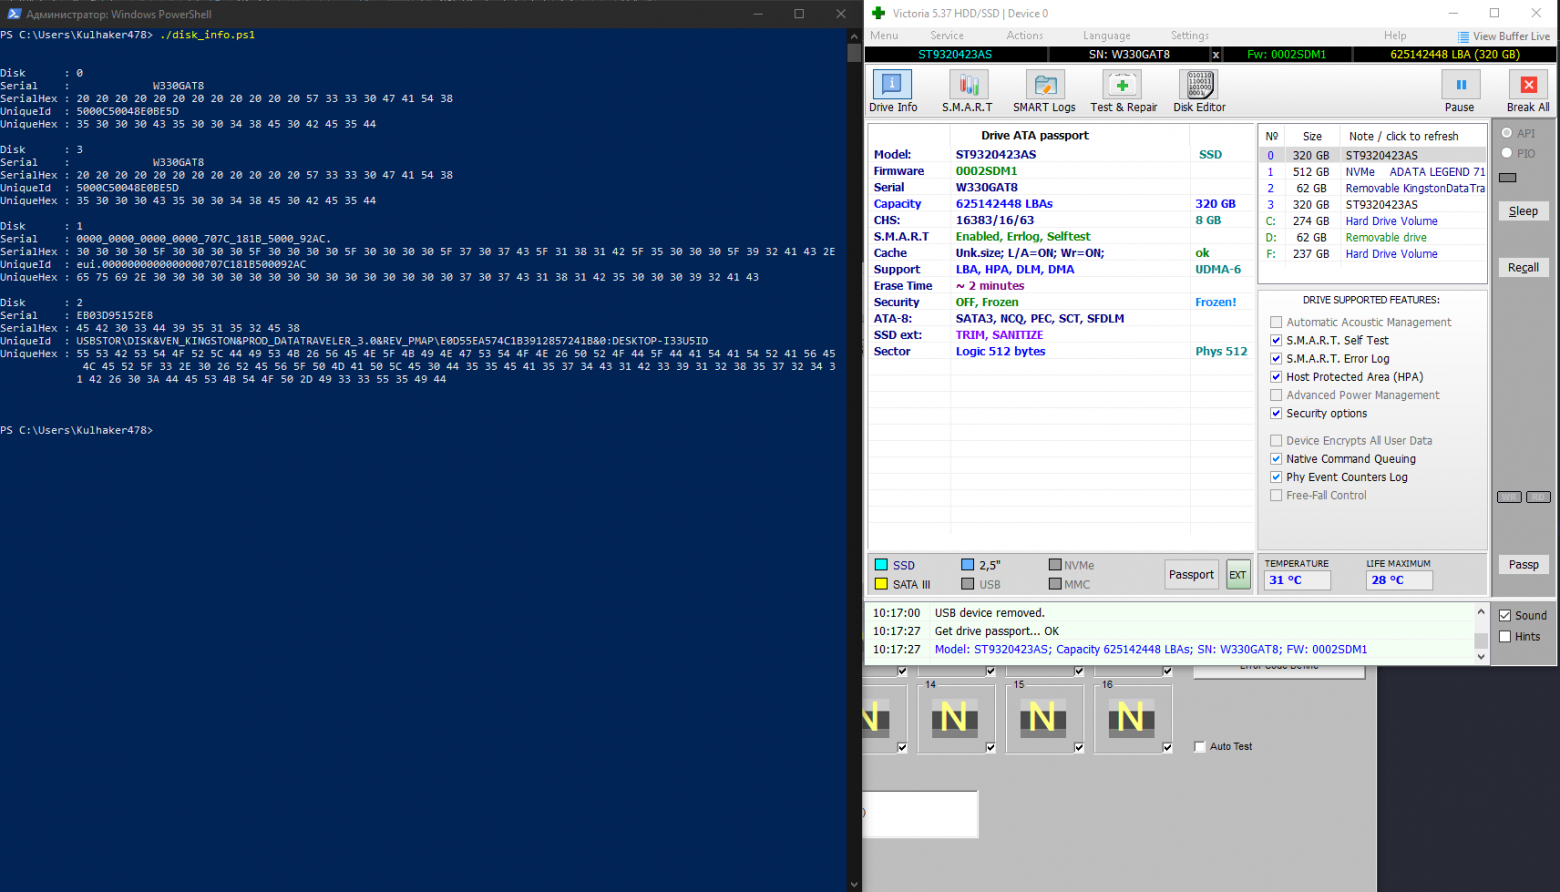
Told you we'd win
Let's Recap
The correct algorithm for flashing a serial number in MPTool:
- Find firmware for your controller + memory combination
- Run the PowerShell script, extract the unique serial numbers
- In MPTool, set all main data; don't touch the serial number; don't change sector count
- Save the config
- In the config file, edit the BEGINSN line, enclosing the SN in quotation marks ""
- Flash
- You're magnificent
What Will the Ultrasound Say?
We connect it, boot up...
Blew the dust out afterward
Aaand, yes! Victory! The shell launched, the machine is ready to work again. And since we upgraded to SSDs, it no longer bothers the doctors with 5-minute freezes.
The finish line
We put the SSD back in its case, not forgetting to mark that it's a slightly unusual drive:
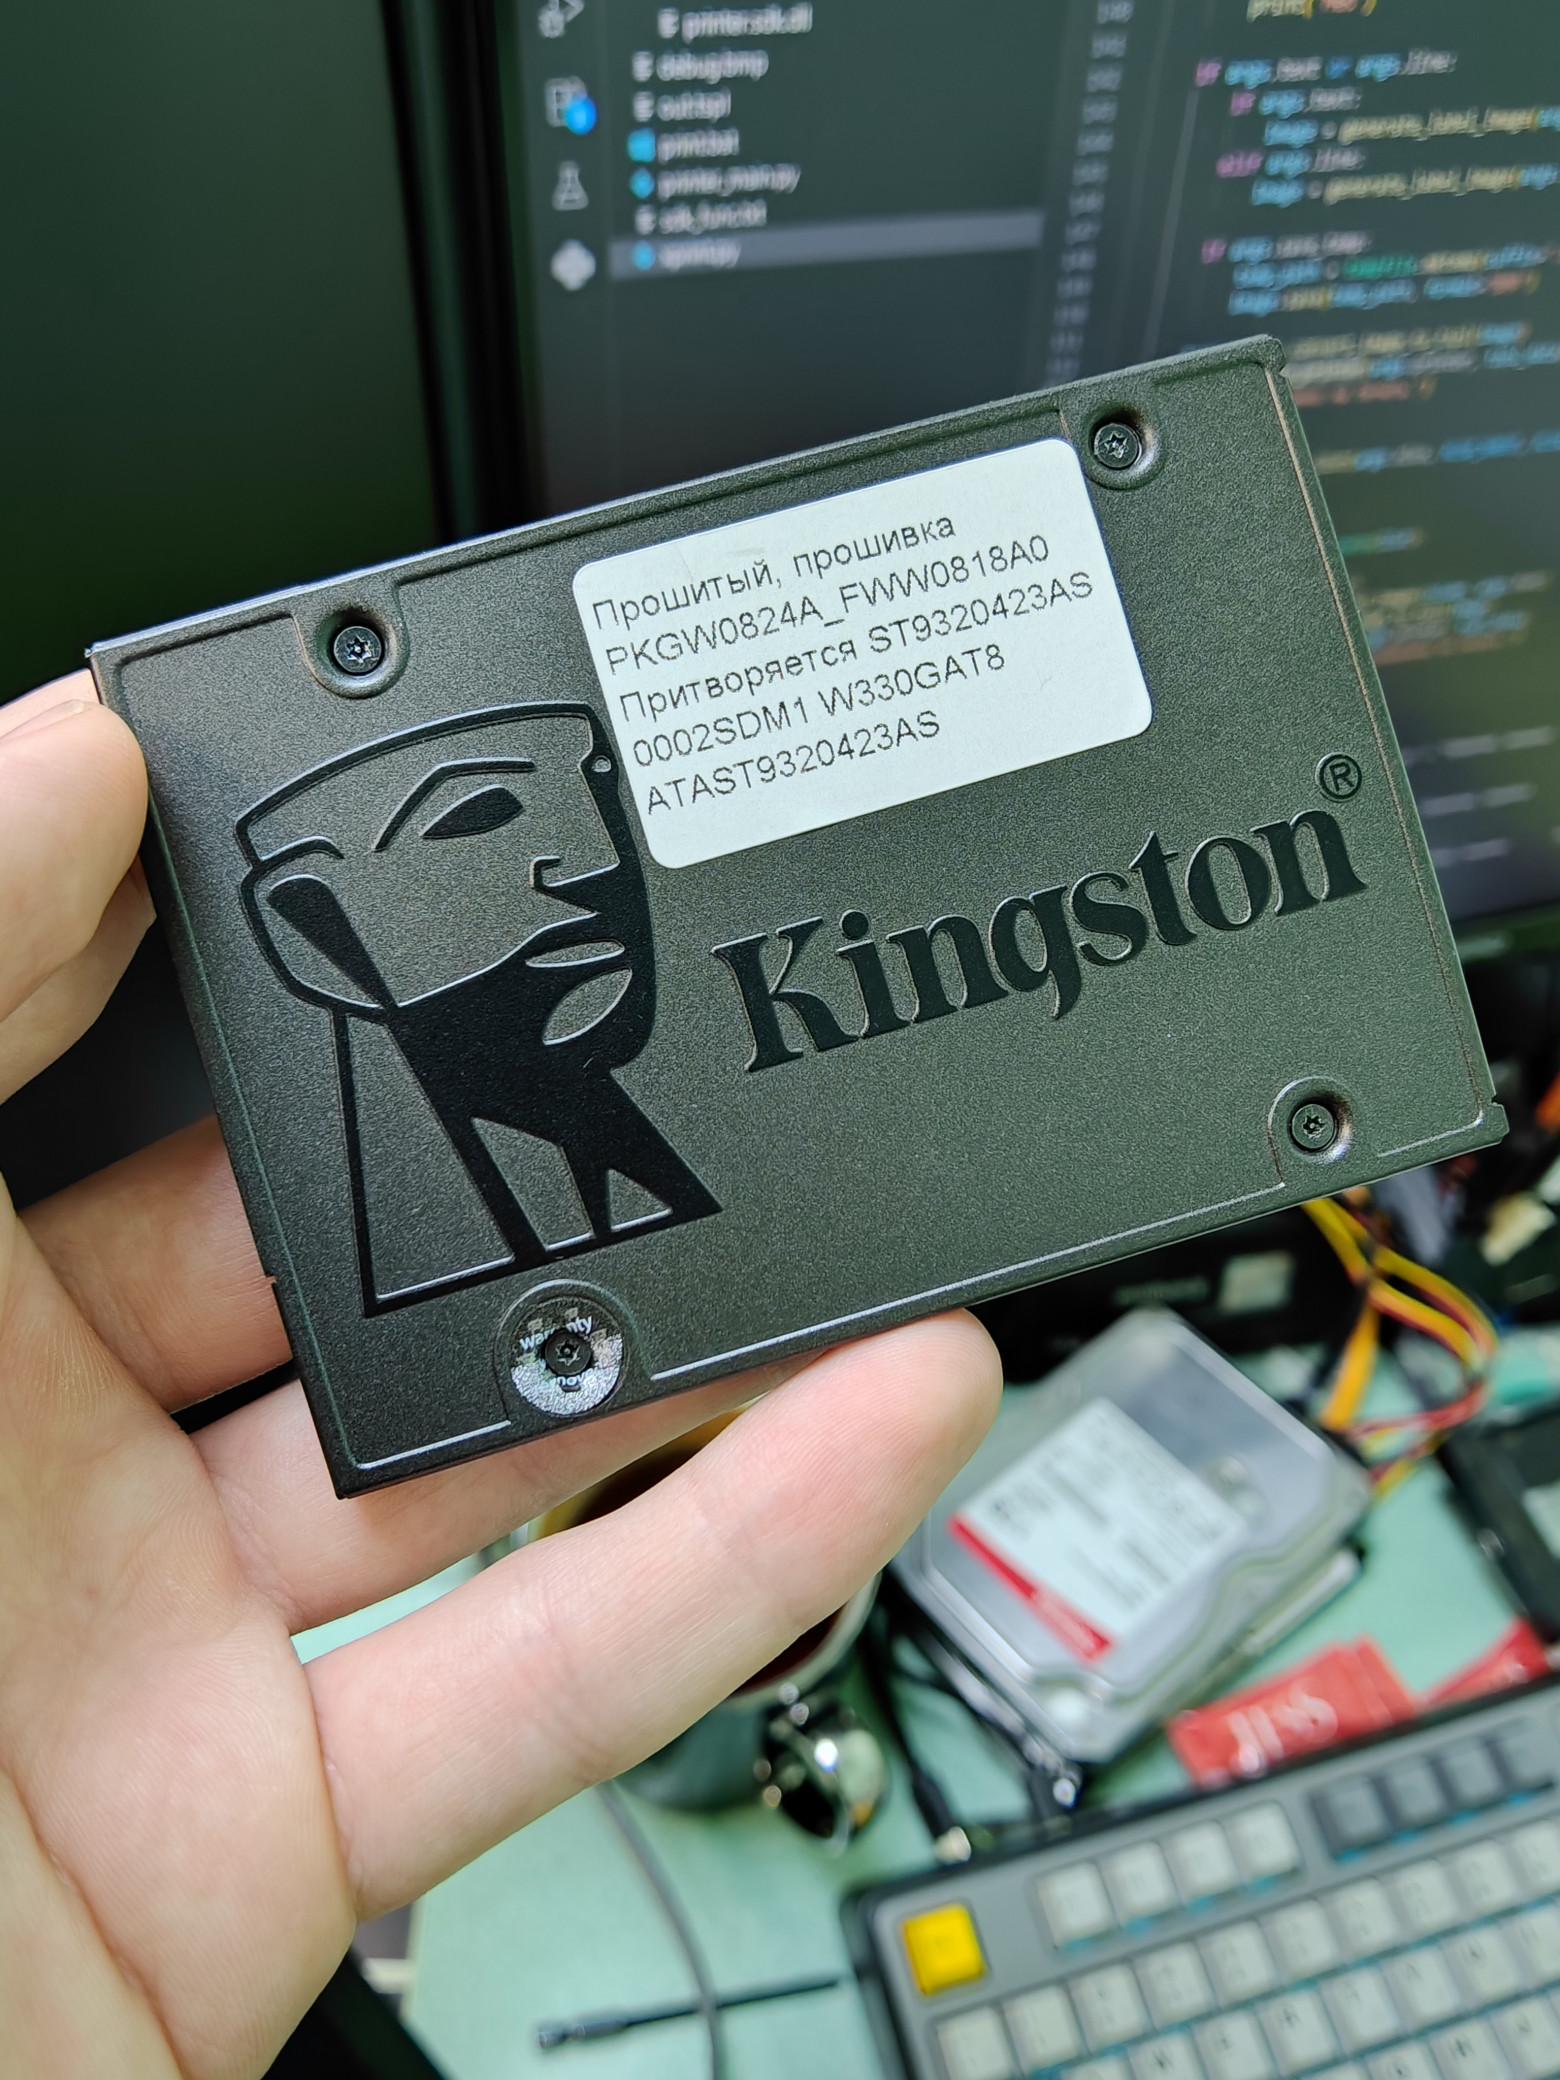
The Philosopher's Stone
And the final photo:
That very Seagate at 480GB
In the end, we managed to fool the ultrasound shell, and the machine went off to the cardiology department to keep working.
And That's a Wrap
So there you have it — a pre-New Year's gift of an article. If the style and content were heavy going, forgive me — this article is more of a warm-up piece; after a long break it's hard to crank out paragraph after paragraph. Thanks for reading — I'm off to trace a PCB for the next project. See you in 2026!


