How to Make a Book for Fifty Rubles
A hands-on guide to creating a proper sewn-binding book at home for virtually nothing — covering paper selection, software workflow for printing from DJVU or PDF sources, folding signatures, stitching, gluing, and assembling a fabric-covered hardcover.
The author republished this material after the original platform disappeared, considering it still entirely relevant. Many people enjoy holding a physical book — especially one they made themselves. Creating a book is surprisingly inexpensive, and finding specific titles in stores can be difficult or impossible. The article provides complete instructions for creating a proper sewn binding, far superior to typical cheap paperback alternatives.
Materials
Paper
Look for paper labeled "handwriting paper" or "writing paper" with a density of 40–65 g/m². This thinner paper (versus standard 80–85 g/m² office stock) produces much more comfortable, readable books. At 60–90 rubles per 500 sheets, a 500-page book costs roughly 36–70 rubles in printing alone. Including cardboard, fabric, thread, tape, and PVA glue, total cost is around 50 rubles — compared to over 1,100 rubles for a store-bought equivalent.

Cardboard
Children's A5 drawing cardboard glued in layers creates rigid covers. Specialty bookbinding cardboard exists but is sold in inconvenient 70×100 cm sheets, making children's cardboard a practical substitute.
Fabric
Cotton fabric covers the binding. Old dense clothing works fine. Thin fabric absorbs glue and creates visible stains — apply glue with a brush in thin layers without white streaks.
Supporting Materials
- Armored thread (shiny, durable bookbinding thread)
- Ribbon or strap, 0.5–1 cm wide
- PVA glue (~25g per book)
- Heavy paper (130+ g/m²) for endpapers
Tools
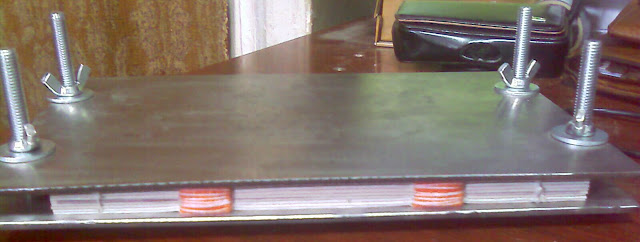
Press: Start with a board and dumbbells, or build one from bolts with wing nuts. A simple pair of boards suffices.
Cutting tools: Sharp knives with replaceable blades are preferred. Circular rotary cutters avoid tearing thin paper. Typographies can cut edges professionally for a small fee.
Other items: rulers, pencils, chalk, brushes, needles, iron.
Software
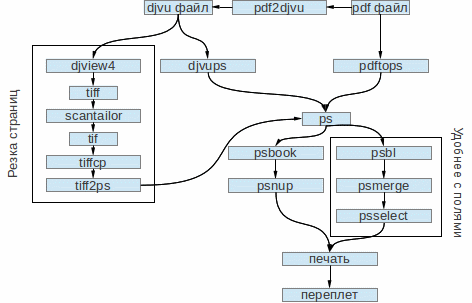
The following utilities handle the digital preparation workflow:
- ScanTailor — splits two-page scans in semi-automatic mode
- Djview4 — converts DJVU to TIFF or PDF
- tiffcp — assembles individual TIF images into a multipage TIFF
- pdf2ps / pdftops — format converters
- psutils — PostScript manipulation tools
- Impose+ — professional book imposition with flexible margin control
- Evince — PostScript viewer
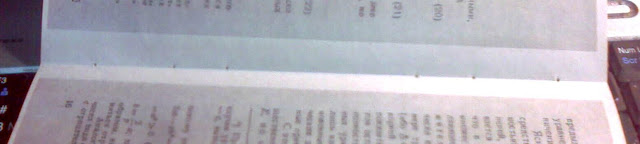
Preparation and Printing
If page splitting is needed (scanned two-page spreads):
- Convert DJVU to multipage TIFF via Djview
- Use ScanTailor to split pages
- Assemble TIF images:
tiffcp -c none ./*.tif ./output.tiff - Convert to PostScript:
tiff2ps -a2 ./output.tiff > output.ps
If no splitting is needed:
djvups -mode=bw -verbose ./in.djvu ./out1.psCreating signatures for printing:
psbl -impose_options "-v -gutter 100 -ym 0 -xm 0" -max_pages 36 ./in.ps
psmerge -oout-all.ps $(ls -mv in.ps.*.imposed | tr "\n" " " | tr "," " ")
Separating odd and even pages:
psselect -o ./in.ps ./out-odd.ps
psselect -e -r ./in.ps ./out-reven.ps
Printing method: Print odd pages first. Without changing the paper orientation, reinsert the stack and print even pages in reverse order. This produces correctly ordered double-sided signatures.
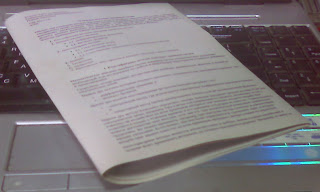
Binding Process
Folding Signatures
Fold 9 sheets per signature. Press the stack under weight to create crisp, uniform folds.
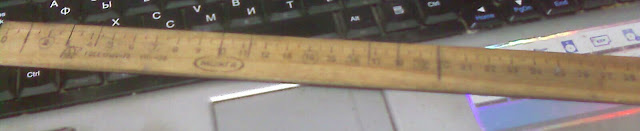
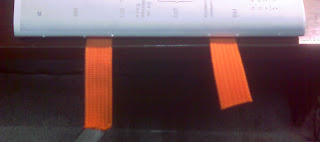
Marking and Piercing
Mark ribbon positions on a ruler and pierce holes with an awl or thick needle. Pierce from the inside of each signature to keep holes invisible from the outside.
Stitching
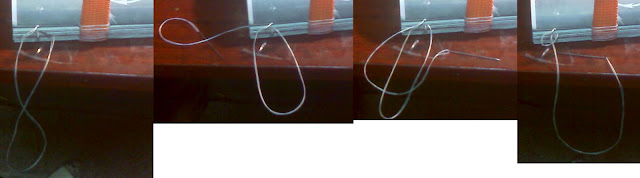
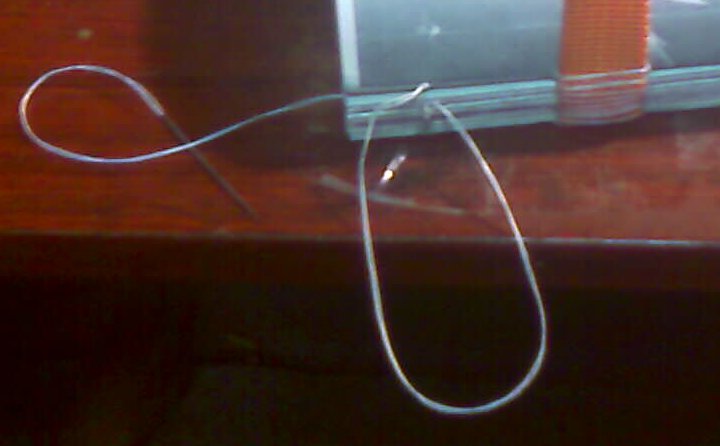
Tape the ribbons to the edge of a table. Stitch signatures to the ribbons and to each other using single knots through loops. Do not stitch ribbons directly — loop the thread over them for later adjustment. Each new signature is stitched to the previous through the loop.
Gluing the Block
Leave the spine protruding 1 cm while gluing, allowing the signatures to separate slightly. Apply glue so it penetrates between signatures. Clamp under the press until completely dry.
Endpapers
Glue the endpaper edges at the signature fold to the first and last pages of the block.
Edge Trimming (Optional)
Trim edges so the cover cardboard extends 3–5 mm beyond the text block, or leave edges untrimmed for a rustic look.
Decorative Elements
- Ribbon bookmarks glued to the spine before covering
- Gauze or muslin strip glued across the spine for reinforcement
- Capitels (decorative head and tail bands) at the top and bottom of the spine
Cover Construction
- Iron the fabric flat
- Cut diagonal corners for clean folding
- Glue 2–3 layers of cardboard together for the front and back covers
- Create a thin cardboard strip for the spine
- Glue fabric over the entire assembly, folding edges under
Assembly
Insert the book block into the cover with glue-covered endpapers against the inside boards. Apply glue thinly — it bonds effectively under press without excess. Insert protective paper inside the endpaper folds to prevent sticking while drying. Ensure proper alignment of block to cover. Pay special attention to ribbon placement. Dry completely under press.
Finishing
After drying, optionally stencil the book title directly onto the cloth cover. The result is a sturdy, well-proportioned hardcover book that far outlasts and outperforms commercial cheap paperbacks.
Conclusion
The process takes half a day once you've done it a few times. Creating books reduces costs tenfold compared to print shops and twentyfold compared to bookstores, while providing the deep satisfaction of craftsmanship. Handmade books prove more pleasant to use than commercial alternatives — encouraging you to actually engage with the content. You can freely mark, annotate, and repair self-made books. The skills developed in bookmaking also open the door to book restoration — drilling through damaged bindings and re-stitching with reinforced support structures.