What is podman kube and how can it be useful for working in rootless mode
While deploying a couple dozen containers in Podman in rootless mode, we suddenly discovered that they could not use the same ports at the same time, as it usually works when using Docker. There are several solutions, but within the imposed restrictions, standard options were not
Editor's Context
This article is an English adaptation with additional editorial framing for an international audience.
- Terminology and structure were localized for clarity.
- Examples were rewritten for practical readability.
- Technical claims were preserved with source attribution.
Source: original publication
While deploying a couple dozen containers in Podman in rootless mode, we suddenly discovered that they could not use the same ports at the same time, as it usually works when using Docker.
There are several solutions, but within the imposed restrictions, standard options were not suitable. As a result, we turned to the Podman Kube functionality, which helped us solve this problem. Read more about how it works and how it can be useful below..
How a simple problem with containers suddenly became difficult
We have many customers to whom we provide DevOps services. At some point, one cloud platform we supported required the implementation of a third-party application - an advanced chatbot. The application was developed by an external organization and provided "as is" without access to the source code. Architecturally, it consisted of about two dozen Docker containers deployed in Docker using a compose file. It is in this form that the deployment code and the distribution itself are transferred for installation. The basic automation tools provided by the vendor include only bash scripts for loading images and a docker-compose file.
The limitations were a customer-approved tool stack, where Podman or Kubernetes should have been used for container orchestration.
We discarded Kubernetes right away, since it would have taken a lot of time to adapt the application, and neither we, nor the customer, nor the vendor had it. Therefore, the choice was reduced to no alternative Podman.
It would seem that in Podman, just like in Docker, we can install podman-compose, and, if desired, even docker-compose, which will work with Podman and run everything in its original form - as provided by the vendor. But we were hampered by an additional strict requirement from the customer - to use Podman only in rootless mode. That is, the engineer is provided with a pre-prepared virtual machine with Podman for work, and can only work with it under an unprivileged user.
Next we encountered a number of problems.
The first is that Podman has a different implementation of container name resolution. Суть в том, что при создании виртуальной сети для контейнеров DNS-резолвером выступает шлюз этой сети. If you create a different network, there will be a different gateway and, accordingly, a different resolver address.
What does this affect? For example, if you have backends in your nginx configuration whose name resolution is based on container names, then in the resolver directive you should change the address to the gateway of your Podman network.
For example, below is the nginx configuration:
server {
  server_name _;
  listen 80 default_server;
  # optional SSL
  include ssl*.conf;
 …
  # global platform timeouts
…
  resolver <шлюз podman сети>;
  # variables for the the proxy_pass forcing NGINX to re‑resolve the domain name when its TTL expires
  set $front http://front.dns.podman:80;
 ...
 ...
}
The resolver directive requires you to specify the gateway address, which we get from the command podman network inspect <network>.For docker this is usually 127.0.0.11).
It is also recommended to add a domain when specifying fronts dns.podmanto avoid name resolution problems when accessing each other via nginx.
It is important to remember that when using CNI to configure the network environment of containers, you must ensure that all required plugins are installed. For example, the dnsname plugin is responsible for DNS operation in a virtual podman network.
However, often out of the box this plugin is not connected to the default network, and you need to create a new podman network for the dnsname to work in it.
Then we started problems related directly to rootless mode.
Access to privileged ports in rootless mode
Publishing ports for containers without root rights is only possible for “high ports”. All ports below 1024 are privileged and cannot be used for publishing.
The problem is usually resolved by allowing the unprivileged ports to be changed using the command sysctl net.ipv4.ip_unprivileged_port_start=80as described in solution from RedHat.
After this, it would seem that everything should have worked, but another problem appeared that forced us to dive deeper into the theory. When running containers in unprivileged mode using normal compose, they conflict over the same ports that are used by services, for example port 80.
Port conflict
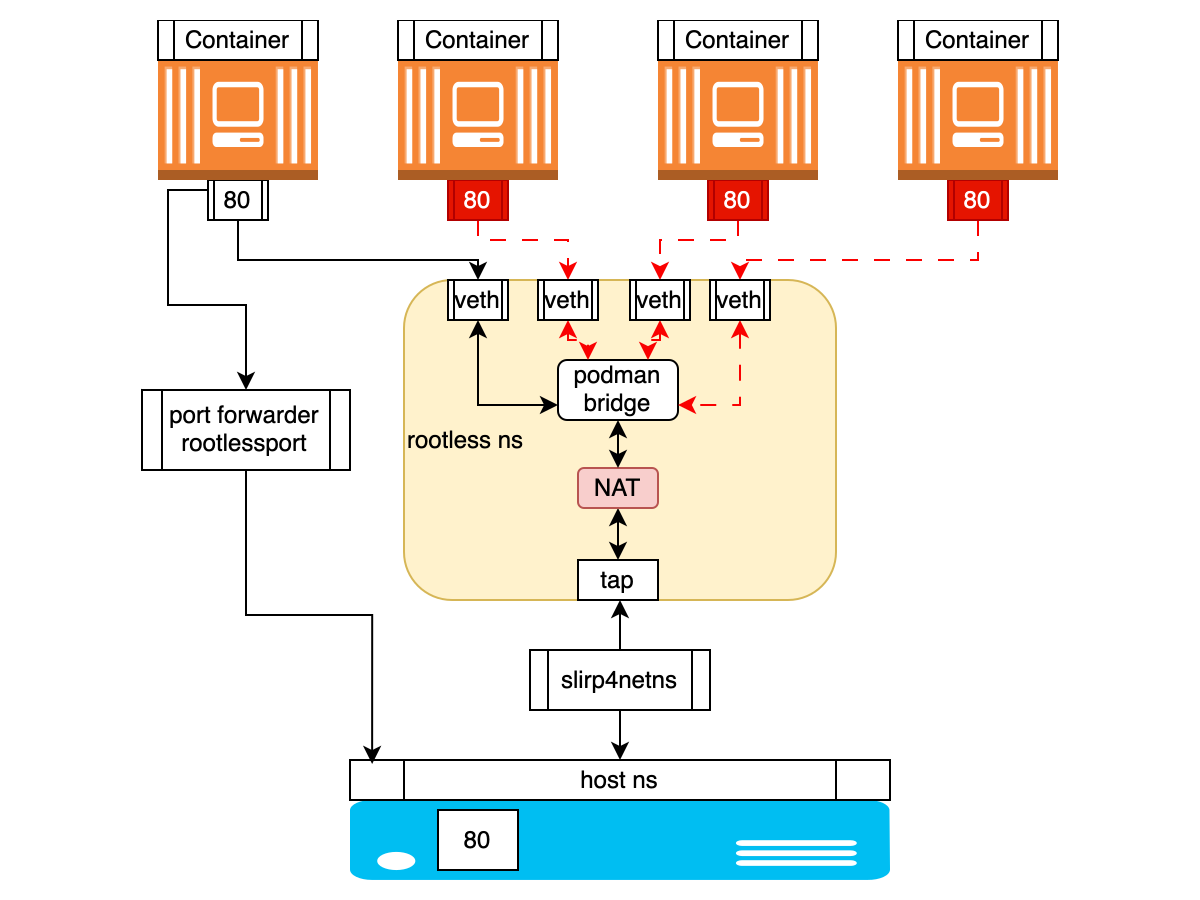
The point is that in the Docker we are used to, containers operate in bridge networking mode. In it, each microservice can bind 0.0.0.0:80 inside the container, and the container becomes available on the Docker network as
But Podman takes a different approach. When using rootless access, network configuration occurs automatically using the slirp4netns network mode, which creates an isolated network stack that allows you to connect to the network from inside the container and bind specific ports of the container to those ports that are accessible to the user on the host itself. In other words, slirp4netns creates a tunnel from the host to the container to forward traffic.
With slirp4netns, containers are completely isolated from each other. There is no virtual network, so to communicate with each other, containers can use port forwarding to the host system - port mapping, and this is where the problem arises that one or another port is already occupied by the first container that started. Or they can be placed in the same Pod, where they will use the same network namespace, where there will also be conflict for ports.
IN description from RedHat this is explained as follows:
When using Podman as a rootless user, the network setup is automatic. Technically, the container itself does not have an IP address, because without root privileges, network device association cannot be achieved. If you're running Podman without root, it can only use the network mode slirp4netns, which will create an isolated network stack so that you can connect to the internet from the inside of your container and bind certain ports of your container to the user-bindable ports on you host, but nothing more. To be able to select the network mode bridged, which does exactly what I need, you'll have to run Podman as root.
Or the same explanation from Podman documentation on GitHub:
One of the drawbacks of slirp4netns is that the containers are completely isolated from each other. Unlike the bridge approach, there is no virtual network. For containers to communicate with each other, they can use the port mappings with the host system, or they can be put into a Pod where they share the same network namespace.
This can be illustrated roughly like this schematically:
A short digression about slirp4nets.
Slirp4netns is a networking tool used by container runtimes to provide network connectivity to containers without the need for privilege escalation.
Slirp is, initially, a program that emulates a PPP, SLIP or CSLIP connection to the Internet using a text shell account. This has long been a legacy tool. Back in the 90s of the last century, students from the United States actively used slirp to surf the Internet through dial-up shell terminals issued by universities. And you can still find these online instructions. However, slirp's capabilities are still actively used both in QEMU and for container networking, especially for unprivileged network namespaces.
But it turns out that this mode is extremely inconvenient in the case when different containers use the same ports internally. Because containers run in the same network namespace, they share the same emulated network stack, resulting in port contention within their isolated network.
And the bridged network mode is only available when running Podman with root access.
Options for resolving the port situation
We have formulated four options for solving the problem:
Replace rootless Podman with rootless Docker, which does not have such restrictions.
Use Podman in privileged mode.
Change microservices ports to be different from port 80.
Bypass the rootless Podman limitation by distributing containers to:
different virtual machines
different virtual networks
different pods
The first two options did not meet the administrative restrictions set by the customer. The third option is too resource-intensive and largely pointless. As a result, we had to think about how to isolate containers competing for port 80.
Splitting into different virtual machines is too resource-intensive.
The division into networks immediately raises many questions, given that in slirp4netns mode we do not operate with networks in principle. Even if they are created separately, how will communication between containers on different networks work, how will name resolution work, because it turns out that each network will have its own DNS resolver address?
And here such Podman functionality as Podman Kube comes to the rescue.
Podman Kube theory
About the function Podman Kube There are few articles, and I have not come across any described cases of practical application in real cases. And even if you ask any GPT model about the main Podman commands, you won’t find anything about Podman kube in the answer. This Podman feature may seem like overkill for most situations, but it helped us a lot.
Let's try to figure out how it works.
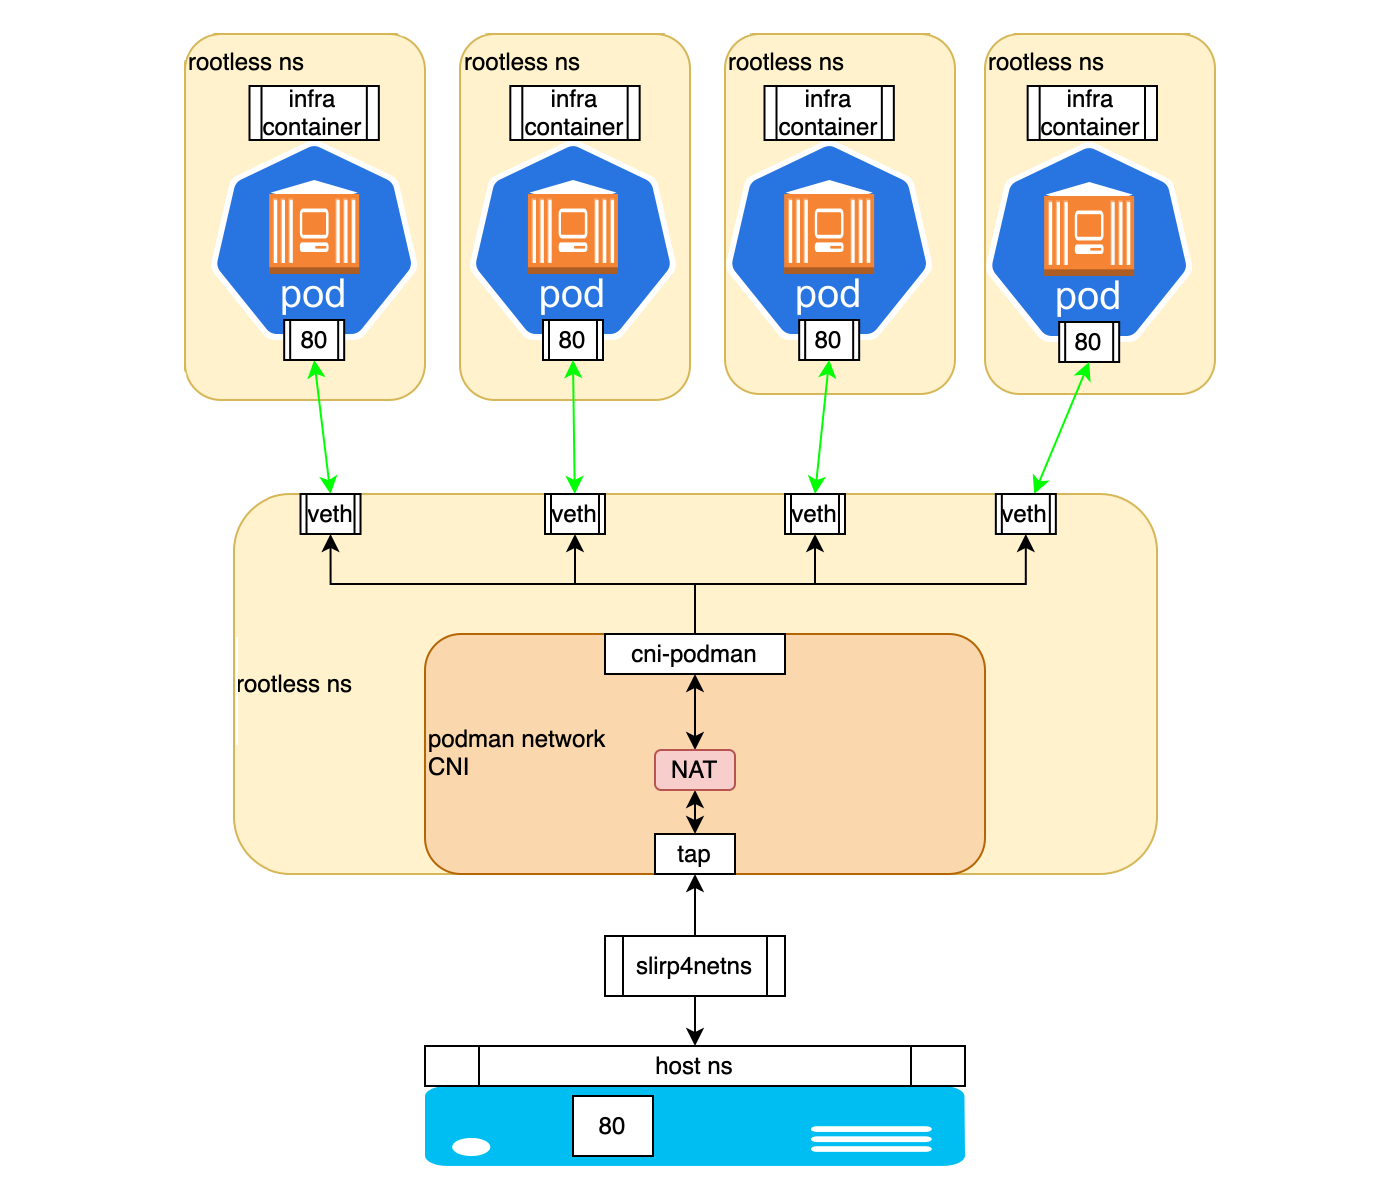
In theory, when we create multiple pods, each pod has its own network namespace. This provides basic isolation of the network stack for each pod.
An important feature turned out to be that for communication between pods when launched through kube play, even in unprivileged (rootless) mode, Podman connects pods to a bridged network. This network can be created in advance, or Podman creates it automatically. Thus, unless you specifically use the host network (parameter network_mode:host), a new network stack is created bridged, which makes communication between pods possible.
At the same time, although the network is called bridge, in rootless mode it is implemented as a virtual network in user space using slirp4netns And CNI plugins. This allows you to create isolated network environments for containers without root privileges, while providing functionality similar to a network bridge. This way, each pod is isolated in its own network namespace, but they are all connected to the same virtual network served by the same slirp4netns process, which allows the same ports to be used in different pods.
On the node we can see this, for example, using certain commands. Let's start by displaying a list of network namespaces:
# sudo lsns -t net
        NS TYPE NPROCS   PID USER      NETNSID NSFS COMMAND
4026531840 net     290     1 root   unassigned      /sbin/init
4026532564 net       8 15259 podman unassigned      /catatonit -P
…
4026532635 net       1 15242 podman unassigned      /usr/sbin/dnsmasq -u root --conf-file=/run/user/915/containers/cni/dnsname/...
Here we can determine that NS 15242 belongs to the slirp4netns process, which configures the network environment using CNI plugins.
Let's see what slirp4netns does:
# ps aux |grep slirp4netns
podman   15173  0.1  0.1  37428 35512 ?        S    Jun11  76:02 /usr/bin/slirp4netns --disable-host-loopback --mtu=65520 --enable-sandbox --enable-seccomp --enable-ipv6 -c -r 3 --netns-type=path /run/user/915/netns/rootless-netns-5df09f647b449af857cc tap0
Using this command, you can go to different nespaces and view network settings: # sudo nsenter -t <ns_pid> -n ip a
In namespaces belonging to pods, we will only see lo And eth0 ports. In the namespace owned by the slirp4netns process we will see tap0, cni-podman0 And veth pairs with corresponding link-netnsid. Also in namespace slirp4netns you can check the iptables rules created to implement NAT.
1: lo: <LOOPBACK,UP,LOWER_UP> mtu 65536 qdisc noqueue state UNKNOWN group default qlen 1000
   …
2: tap0: <BROADCAST,UP,LOWER_UP> mtu 65520 qdisc pfifo_fast state UNKNOWN group default qlen 1000
    ..
    inet 10.0.2.100/24 brd 10.0.2.255 scope global tap0
    3: cni-podman0: <BROADCAST,MULTICAST,UP,LOWER_UP> mtu 1500 qdisc noqueue state UP group default qlen 1000
    …
    inet 10.89.0.1/24 brd 10.89.0.255 scope global cni-podman0
       …
4: veth3c23371b@if2: <BROADCAST,MULTICAST,UP,LOWER_UP> mtu 1500 qdisc noqueue master cni-podman0 state UP group default
    link/ether <mac_address> link-netnsid 0
   …
5: veth71b41f66@if2: <BROADCAST,MULTICAST,UP,LOWER_UP> mtu 1500 qdisc noqueue master cni-podman0 state UP group default
    link/ether <mac_address> link-netnsid 1
    …
The process is as follows:
When the pod starts, slirp4netns creates a virtual network stack in user space.
CNI manages the distribution of IP addresses for containers in the virtual network and is responsible for routing.
A virtual eth0 interface is created within each network namespace. This eth0 is virtually connected to the common network through a veth pair. And the network itself is an interface cni-podman0 is a virtual bridge created by CNI. From the pod's point of view, it has a direct connection to the network. slirp4netns uses the tap0 interface to communicate with the host. It also exists in the context of slirp4netns, not in the namespace of the pods.
Pods are assigned IP addresses from the range defined for the created bridge network. These addresses are only visible within the virtual network and are not directly accessible from the host. In this case, pods can communicate with each other through a virtual network. Slirp4netns provides NAT for outgoing traffic from pods, but incoming connections usually require explicit port forwarding.
And in order for the Pod to remain “alive” when the container it contains is restarted or stopped, Podman uses a so-called infra container based on the pause image, which does absolutely nothing. Its task is to reserve and maintain the pod itself and, accordingly, the namespace associated with it throughout the entire life cycle of all containers included in it.
This can be illustrated roughly like this schematically:
Thus, this configuration strikes a balance between isolation (separate namespaces) and connectivity (shared virtual network). Each pod is isolated, but they are all connected to the same virtual network, served by a single slirp4netns process.
In this paradigm, kube play provides special capabilities because it is probably intended by the RedHat developers to be as close as possible in behavior to Kubernetes.
It’s interesting that mention of this Podman algorithm comes up mainly only in discussions of bugs on github here And here.
Podman Kube practice
Now let's look at how this structure can be controlled.
In many ways, the functionality of Podman Kube can be described as a kind of Kubernetes at a minimum. To launch containers, manifests in YAML format are used, which are as close as possible to K8s YAML manifests. They have the ability to specify ConfigMap, Volumes, VolumeMounts and describe the container to be launched. By analogy with a compose file, you can describe several containers and run them either in the same pod or in different ones.
Examples of manifestos:
1. Pod Description
In it, by analogy with K8s, we describe apiVersion, kind, metadata and spec. In spec we indicate a description of containers, volumes and environment parameters.
apiVersion: v1
kind: Pod
metadata:
  labels:
    app: nats
  name: nats
spec:
  containers:
  - name: nats
    image: nats:2.9-alpine
    args:
    - --jetstream
    - --port
    - "4222"
    - --http_port
    - "8222"
    - --store_dir
    - /data
    volumeMounts:
    - mountPath: /data
      name: nats-data
  volumes:
  - hostPath:
      path: /home/podman/nats/data
      type: Directory
    name: nats-data
2. Description of the Pod along with ConfigMap
Also, by analogy with K8s, in the manifest for ConfigMap we describe apiVersion, kind, metadata and indicate our environment variables. Further in the description of the pod we refer to ConfigMap.
apiVersion: v1
kind: ConfigMap
metadata:
  name: nginx-config
data:
  QUERY_PREFIX: /api/v1
  CRUD_PREFIX: /api/v1
  SSL_KEY_PATH: /ssl/tls.key
  SSL_CERT_PATH: /ssl/tls.crt
---
apiVersion: v1
kind: Pod
metadata:
  labels:
    app: nginx-router
  name: nginx-router
spec:
  containers:
  - name: nginx-router
    image: nginx-router:5.6
    args:
    - nginx
    - -g
    - daemon off;
    envFrom:
    - configMapRef:
        name: nginx-config
        optional: false
    ports:
    - containerPort: 80
      hostPort: 80
    - containerPort: 443
      hostPort: 443
    volumeMounts:
    - mountPath: /ssl/tls.crt
      name: https-crt
      subPath: /home/podman/cert/tls.crt
    - mountPath: /ssl/tls.key
      name: https-key
      subPath: /home/podman/cert/tls.key
    - mountPath: /var/cache/nginx
      name: nginx-cache
  volumes:
  - hostPath:
      path: /home/podman/cert/tls.crt
      type: File
    name: https-crt
  - hostPath:
      path: /home/podman/cert/tls.key
      type: File
    name: https-key
  - hostPath:
      path: /home/podman/nginx/nginx-cache
      type: Directory
    name: nginx-cache
Automatic generation of YAML manifests
To use the functionality of Podman Kube, you need to write YAML manifests from scratch, or manually refactor compose files into YAML manifests.
The good thing is that Podman makes life easier with the ability to generate YAML manifests using the command podman kube generate. There is only one condition: the containers must be running. Here you can use either the commands podman run, or the same compose file. However, it is not necessary that the container operate correctly and without errors. It only requires that Podman see them running.
Having thus obtained the basic description, we can modify it. For example, remove unnecessary or add required ENV variables, adjust names and parameters for volumes and volume-mounts. In general, result in a form that satisfies all your requirements for a correct launch.
Example command sequence:
Running a container: podman run -d -it imageID
Let's look at the container id: podman ps
Create a manifest: podman kube generate ctrID
Other details can be found in RedHat documentation.
So, we got what we wanted - we organized the containers into pods, or rather, distributed them into manifests for launching in isolated pods. Once the manifests are prepared, the podman kube play and podman kube down commands are used to start and stop the pods.
For example:podman kube play pod.yaml --network mynet
podman kube down pod.yaml
It’s worth noting right away that Podman has no analogues to ReplicationController or ReplicaSet. That is, we, unfortunately, cannot control the number of running instances of our pod.
Working with Podman secrets
Every time we create manifests, we are faced with the need to transfer sensitive data, such as database connection passwords or account elements. Working with sensitive data in Podman Kube is based on the standard podman secret function. In the YAML manifest for Podman Kube, we can define which variables we will take from the created secrets.
Unfortunately, at the time of writing there was no way to integrate the creation of a “secret” into the general manifest of the pod description. On the other hand, this allows you to use the same “secrets” in different pods, which is convenient if services access the same databases or IAM providers.
For example, we can create a "secret" by declaring it in a separate YAML manifest:
apiVersion: v1
data:
  password: base64encodedvalue
kind: Secret
metadata:
  creationTimestamp: null
  name: my-password
And run the command podman kube play secret.yml.
We can then access it in the manifest using the instruction:
 env:
    - name: MY_PASSWORD
      valueFrom:
        secretKeyRef:
          name: my-password
          key: password
This is described in more detail in RedHat documentation.
Difficulty accessing pod logs
Special attention will have to be paid to the correct logging settings. Out of the box, we received errors when trying to output logs using podman logs and the --follow flag.
In rootless mode with the journald driver, Podman has problems accessing logs, and to solve this problem you need to make changes to the local configuration file .config/containers/containers.conf:
[containers]
log_driver = "k8s-file"
There are more details on this topic in the knowledge base RedHat.
Data storage and other settings
And a few words about data storage. At the time of writing, Podman supports two types of volumes: persistentVolumeClaim and hostPath.
You can set the persistentVolumeClaim type directly in the main YAML description of the pod, for example:
 apiVersion: v1
 kind: PersistentVolumeClaim
 metadata:
   name: example-pv-claim
   labels:
     app: example
 spec:
   accessModes:
   - ReadWriteOnce
   resources:
     requests:
       storage: 20Gi
And then use it in the pod itself, by analogy with manifests in K8s:
 volumes:
   - name: example-persistent-storage
     persistentVolumeClaim:
       claimName: example-pv-claim
It should be noted that the Podman project is developing quite dynamically, and the first versions are full of all kinds of bugs.
For example, in order for Podman Kube to be able to use native podman secretes to integrate them with ENV variables, a version of at least 4.4 is required, in which bug fixed, not allowing correctly transform contents of "secrets" in play kube mode.
Podman 4.4 also includes the ability to integrate pod management into systemd using Quadled.
Briefly about how it works.
We can create a pod description manifest as shown in the examples above. And create a configuration file with the .kube extension, for example example.kube, in which we indicate our manifest:
[Install]
WantedBy=default.target
[Kube]
Yaml=example.yml
Additionally, we can introduce directives similar to the configuration of systemd services, for example, if we want a pod to start after another pod:
[Unit]
Requires=first-pod.service
After=first-pod.service
Next, both files must be placed in the directory ~/.config/containers/systemd/ and restart systemd daemon: systemctl --user daemon-reload
If we describe the ConfigMap in a separate file, it can be specified in the [Kube] block: ConfigMap=example-configmap.yml
In this case, this file also needs to be placed in ~/.config/containers/systemd/.
In the [Kube] block it is also possible to specify a separate network and forward ports:
Network=example.networkPublishPort=8000:8080
As a result, we can start the pod using systemctl like this: systemctl --user start example.service
Read more about this described in the documentation RedHat.
Brief summary
It turned out that to work in unprivileged mode, which has always been considered one of the main advantages, Podman offers users to move away from the compose file paradigm to the use of more modern and ubiquitous YAML manifests and running them through the “play kube” functionality.
This allows you to bypass the restrictions of the unprivileged slipr4netns network stack. And from the point of view of developing and further deploying applications in Kubernetes, this approach looks even more rational, since developers can launch and test services locally from the very beginning using “K8s-ready” YAML manifests, making continuous integration and delivery processes more seamless.
I hope our experience will serve as a kind of hint to those who find themselves in a similar situation, and will help them see most of the pitfalls that come across in the process of implementing this approach.
Why This Matters In Practice
Beyond the original publication, What is podman kube and how can it be useful for working in rootless mode matters because teams need reusable decision patterns, not one-off anecdotes. While deploying a couple dozen containers in Podman in rootless mode, we suddenly discovered that they could not use the same ports at the s...
Operational Takeaways
- Separate core principles from context-specific details before implementation.
- Define measurable success criteria before adopting the approach.
- Validate assumptions on a small scope, then scale based on evidence.
Quick Applicability Checklist
- Can this be reproduced with your current team and constraints?
- Do you have observable signals to confirm improvement?
- What trade-off (speed, cost, complexity, risk) are you accepting?


