Writing our first module for the Linux kernel
The Linux kernel is perhaps the most ubiquitous (and still underappreciated) piece of software code today. All Linux distributions are based on it (obviously), but that's not all. In addition, the Linux kernel runs a huge amount of firmware almost everywhere. Do you have a microw
Editor's Context
This article is an English adaptation with additional editorial framing for an international audience.
- Terminology and structure were localized for clarity.
- Examples were rewritten for practical readability.
- Technical claims were preserved with source attribution.
Source: original publication

The Linux kernel is perhaps the most ubiquitous (and still underappreciated) piece of software code today. All Linux distributions are based on it (obviously), but that's not all. In addition, the Linux kernel runs a huge amount of firmware almost everywhere. Do you have a microwave? It probably runs on the Linux kernel. Dishwasher? Same. Are you a wealthy person and have purchased a Tesla car? Maybe you will find some bugs in it and fix them, in which case, you can send the patch to them on Github, where the code for Model S and Model X. Electronic filling of the ISS, thanks to which the station does not fall to Earth as a deadly and destructive fireball - Of course, it also works under Linux. The core is lightweight. This is probably why it works so well in low gravity conditions.
The Linux kernel goes through a development cycle that is, frankly, insane. Eat statistics for kernel version 5.10 patch, judging by which, 252 new authors participated in this release, making and committing changes to the repository (and this is the smallest number of contributors since kernel version 5.6). And new releases come out every 9 weeks. All things considered, the Linux kernel does provide a solid foundation for much of modern computing, but it is by no means archaic. This is all well and good, but what if you want to delve into the kernel yourself and maybe even write some code for it yourself? This can be a bit of a tedious undertaking, since this is an area of programming that isn't covered much in most schools and bootcamps. In addition, this is not the case with any JavaScript framework that “shot to the top” this month. It falls out of the blue, so you can’t just go to StackOverflow and find a million entries there that will allow you to untangle any problems.
This is how we live. So, are you interested in your own “hello world” project that will mark the beginning of the most enduring open source project of our time? Or do you want to try operating systems theory, at least in small doses? You enjoy programming in a language created in the 1970s, it fills you with a deep sense of satisfaction when you can do literally anything and it will work? Great, because honestly, I can't think of a better way to spend my time.
Please note: in this article, I assume that you know how to set up a virtual machine on Ubuntu and know how to do it. There are plenty of publicly available resources outlining this process, so open up your favorite virtual machine manager and get to work. I also assume that you are at least a little familiar with C, since the kernel is written in this language. Since we're going to write a "hello world" level module, we won't be doing any advanced programming here, but I won't be giving any background information on the concepts of the language either. However, the code is planned to be so simple that it should be self-explanatory. After all these warnings, let's go!
Writing a simple module
First we need to define a kernel module. A typical module, also called a driver, is somewhat similar to an API, but occupies an intermediate niche between hardware and software. Look, in most operating systems, all the business happens in just two places: kernel space and user space. Linux is definitely designed this way, and so is Windows. In the user space, things are done regarding user activities - for example, listening to a song on Spotify. All low-level things, the under-the-hood work of the OS, are done in the kernel space. If you are listening to a song on Spotify, then the computer must establish a connection with the servers of this site, and the computer must have a mechanism that receives packets from this resource, extracts data from them and, finally, transmits them to the speaker or headphones so that you can hear the sound. This is what happens in core space. One of the drivers involved here is a program that allows packets to pass through your network port, after which their contents are converted into music. The driver itself must have an API-like interface through which user-space applications (or even kernel-space applications) can call its functions and retrieve these packages.
Fortunately, our module will be designed completely differently, so don't worry. It won't even interact with any hardware. Many modules are entirely software based. A good example of this is the kernel's process scheduler, which specifies how many of your CPU cores will be working on each running process at any given moment. A module that works exclusively with software is also best suited for getting to know the topic for the first time. Start the virtual machine, open the console window using Ctrl+Alt+T, and then it’s a matter of technique.
sudo apt update && sudo apt upgradeThis way you can make sure that you are using the current version of the software. Next, let's get the new software packages that we need for our business. We carry out
sudo apt install gcc make build-essential libncurses-dev exuberant-ctagsNow you can start programming. At first everything is easy, we just paste the following code into the source file. I put mine in the Documents folder and called it dvt-driver.c
#include <linux/init.h>
#include <linux/module.h>
#include <linux/uaccess.h>
#include <linux/fs.h>
#include <linux/proc_fs.h>

// Module metadata
MODULE_AUTHOR("Ruan de Bruyn");
MODULE_DESCRIPTION("Hello world driver");
MODULE_LICENSE("GPL");

// Custom init and exit methods
static int __init custom_init(void) {
 printk(KERN_INFO "Hello world driver loaded.");
 return 0;
}

static void __exit custom_exit(void) {
 printk(KERN_INFO "Goodbye my friend, I shall miss you dearly...");
}

module_init(custom_init);
module_exit(custom_exit);
Note that we don't need all of these enablers right now, but we will be enabling them all soon enough. Next, this code needs to be compiled. We create a new Makefile in the same place where the source code is located, and write the following contents to this file:
obj-m += dvt-driver.o

all:
	make -C /lib/modules/$(shell uname -r)/build M=$(PWD) modules
clean:
	make -C /lib/modules/$(shell uname -r)/build M=$(PWD) clean
Open a console window in the directory where the two above files are located and run
make. At this point, you should already be able to see some output in the console describing how your module is compiled, and this entire process ultimately produces the dvt-driver.ko file. This is your fully functional compiled kernel module. Let's load this breakthrough piece of intellectual property into the core, let's try it? It won't make any difference here on its own. In the same directory where your code is located, run:sudo insmod dvt-driver.ko- and then your driver will be inserted into the kernel. You can verify this by running
lsmod, this command will list all modules currently in the kernel. Among them you will see dvt_driver. Please note that when loading the file name (your module), the kernel replaces hyphens with underscores. If you want to get rid of this, you can do:sudo rmmod dvt_driverIn the source code, we also want to organize logging so that we know whether the driver loaded normally, so we run the command in the terminal window
dmesg. This command is a shortcut; it allows you to display kernel logs on the screen, as well as tidy them up a little for greater readability. In the very last lines of the output from dmesg there should be driver messages, for example, “hello world driver has been loaded”, etc. Please note: there is a lag in the output of the init and exit function messages from the drivers, but if you insert and remove the module twice, you should see all these messages recorded in the logs. If you want to see “live” how these messages are logged, then open a second terminal window and execute dmesg --follow. Next, when in another terminal window you first insert your driver and then remove it, you will see the following messages begin to pop up.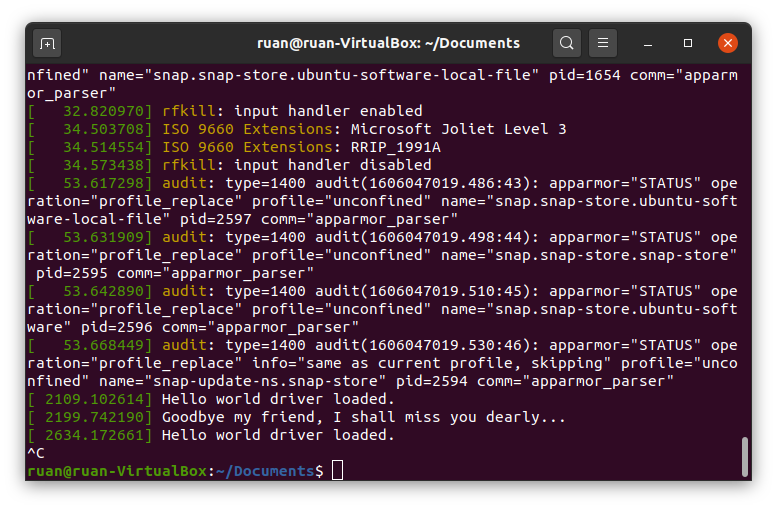
My dmesg output is follow after I inserted and removed the module twice
So, let's note what we have already achieved. Source code begins with metadata that describes the module. You can do without indicating the author, etc., but you can also put your name there. The compiler will also give you a stern warning if you don't include the license code, and since I've been pathologically desiring approval and acceptance from just about "anything that moves" my whole life, I simply have to include the above license code. If such psychological tossing doesn’t bother you, then perhaps it doesn’t hurt to note that kernel support participants are very wary of taking code that is not open source - and are very attentive to such details as the license. Large companies in the past did not allow proprietary modules to be inserted into the kernel source code. Ugh be like that. Be good. Write free software. Use open source licenses.
Now let's make our own init and exit functions. Whenever a module is loaded into the kernel, that module's init function is executed—and vice versa, when it is removed from the kernel, its exit function is executed. Our functions don't do much, just write text to the kernel logs. Function
printk() is the kernel version of the classic print function from the C language. Obviously, the kernel does not have any terminal or screen where you could print arbitrary things, so the function printk() displays kernel logs. There is a macro KERN_INFO for logging general information. You can also use a macro like KERN_ERROR in case an error occurs, this macro will change the output formatting to dmesg. Anyway, the two functions init and exit are registered in the last two lines of the source code. This will have to be done; There is no way for your driver to know what functions to perform anymore. Also, you can call them whatever you want, as long as their signature (arguments and return type) is exactly the same as what I used.Finally, there is also a Makefile. Many open source projects use the GNU Make utility to compile libraries. Typically it is used with libraries written in C/C++ and simply helps you automate code compilation. The Makefile listed here is a standard tool that allows you to compile a module. The first line attaches that file
.o, which has yet to be compiled, to a variable obj-m. The kernel also compiles in the same way and attaches files multiple times.o to this variable before compilation. In the next line we'll mess around a little. You see, the rules and commands for building kernel modules are already defined in the Makefile that comes with the kernel. We don't have to write our own rules, we can use those written in the kernel... and that's exactly what we'll do. In argument -C we will point to the root directory with our kernel sources. Then we'll tell you to target the working directory of our project and compile the modules. Voila. GNU Make is an unexpectedly powerful compilation tool that can automate the compilation of any project, not just those written in C/C++. If you want to read more about this, here's the book, absolutely free of charge (that is, for nothing)./proc entry
Let's move on to the juiciest part of this post. Log records about events in the kernel are, of course, very good, but this is not why masterpiece modules are written. I mentioned earlier in this article that kernel modules typically act as APIs for user-space programs. Right now our driver doesn't do anything like that yet. Linux has a very neat way of handling these interactions: working with the "everything is a file" abstraction.
To see this, open another terminal window and run
cd /proc. Having completed ls, you will immediately see a long list of files. Now do cat modules – and you will see text on the screen. Does it look familiar? Should; here are all the modules presented by the team lsmod, which you have already launched before. Let's try cat meminfo. Now we have information about how the virtual machine uses memory. Cool. The last command we will try is: ls -sh. It lists the size of each file, as well as its name and... wait, what? What kind of nonsense is this?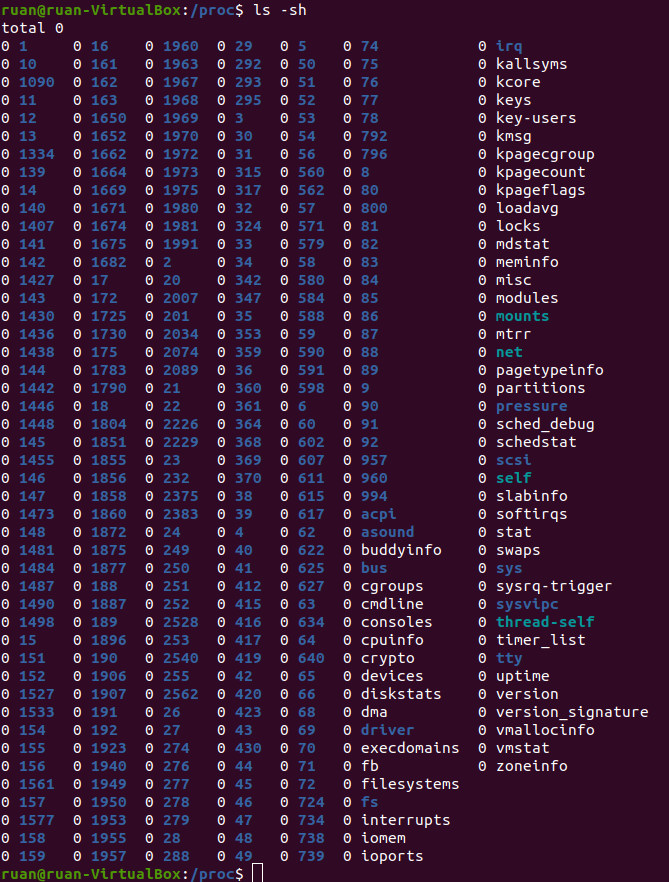
They are all 0 in size. Zero is nothing. And even if not a single bit is spent on these files, we are simply reading their contents?.. Yes, in fact, everything is correct here. Look,
/proc - This is a directory with processes, one might say, the central place from which user space applications obtain information about kernel modules (and sometimes can gain control over them). In Ubuntu, the analogue of Task Manager is called System Monitor, it can be launched by pressing the key indicating the OS on the keyboard and entering “system” - at this point a quick transition to System Monitor should appear. System Monitor shows statistics: for example, what processes are running, how CPU, memory is used, etc. He receives all this information by reading from the catalog /proc special files, for example meminfo.Let's add the following functionality to our driver: let's make sure we have our own entry in
/proc. We will do this so that whenever a user space application reads something from there, it will display a hello world greeting message to us. Replace all the code under our module metadata with the following:static struct proc_dir_entry* proc_entry; static ssize_t custom_read(struct file* file, char __user* user_buffer, size_t count, loff_t* offset) { printk(KERN_INFO "calling our very own custom read method."); char greeting[] = "Hello world!\n"; int greeting_length = strlen(greeting); if (*offset > 0) return 0; copy_to_user(user_buffer, greeting, greeting_length); *offset = greeting_length; return greeting_length; } static struct file_operations fops = { .owner = THIS_MODULE, .read = custom_read }; // Наши собственные методы init и exit static int __init custom_init(void) { proc_entry = proc_create("helloworlddriver", 0666, NULL, &fops); printk(KERN_INFO "Hello world driver loaded."); return 0; } static void __exit custom_exit(void) { proc_remove(proc_entry); printk(KERN_INFO "Goodbye my friend, I shall miss you dearly..."); } module_init(custom_init); module_exit(custom_exit);
Now remove the driver from the kernel, recompile and insert a new module into the kernel
.ko. Execute cat /proc/helloworlddriver – and you should see our driver display a hello world greeting message in the terminal window. I think it's very cute. But alas, the team catis probably too simple to really convey the point of what we're doing here - so let's write our own user-space application that interacts with this driver. Put the following Python code into a script that you can put in any directory (I called mine hello.py):kernel_module = open('/proc/helloworlddriver') greeting = kernel_module.readline(); print(greeting) kernel_module.close()
This code should be self-explanatory: as you can see, this is how file I/O would be done in any programming language. File
/proc/helloworlddriver is our API for the kernel module we just wrote. Having completed python3 hello.py, you will see our greeting displayed in the terminal window. Cool. 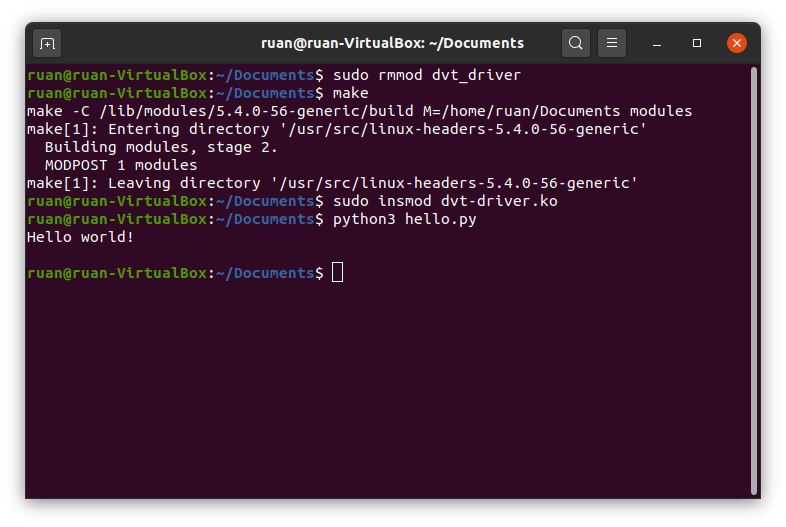
The result of executing a Python script after removing, recompiling, and inserting the module into the kernel.
In our code, we made our own read function. As you may have guessed, you can simply override the write function if your module requires user-space input. For example, if you have a driver that controls the rotation speed of the fans in your PC, you can give it a write function, in which we will write a percentage value in the range from 0 to 100 to a file - and, based on it, your driver will adjust the fan speed accordingly. If you are interested in how exactly this function overriding works, read the next section. If not, skip straight to the final part of the article.
Bonus section - How does it all work?
In this section, I will outline some aspects that may be of interest to you: I will describe how exactly the read/write functions are overridden for writing
/proc. To explore this issue, we will need to delve seriously into operating system theory and use assembly language as an analogy.In assembly language, your program has a stack that keeps track of the history of the variables you create during execution. This structure is slightly different from a stack in the canonical sense in which it is understood in computer science; however, because elements can be pushed into and out of this structure, arbitrary elements on the stack—not just the top one—can also be accessed, modified, and read. Okay, let's say you define a function in assembly code that takes two arguments. You are not just hand over these variables when calling a function, no. Passing variables in square brackets to functions is a task for hobbyists copying Python code for a chatbot, and the code was taken from an online tutorial. Programmers working with assembler - These guys are on a completely different scale, their craft allowed land Apollo 11 on the moon. As they say, you can't pull a fish out of a pond without difficulty. Before calling a function with two arguments, you need to push those arguments onto the stack. Then you call a function, which, as a rule, reads the arguments from the top of the stack and then from the end to the beginning, and uses them as needed. This is a real minefield, as it's easy to push your arguments onto the stack in the wrong order and result in your function treating them as gibberish.
I mention this because in your operating system the code is executed in approximately the same ways. The operating system has its own stack where variables are kept track of, and when the kernel calls an operating system function, that function looks up the arguments at the top of the stack and then executes. If you want to read a file from disk, you call the read function with a few arguments, those arguments are pushed onto the kernel stack, and then the read function is called to read all or part of the file from disk. The kernel keeps track of all its functions in a huge table, each entry in which contains the name of the function and the memory address where this function is stored. This is where our own functions come in handy. Look, even though our module’s interactions are carried out through files, there is no iron-clad rule that states that when reading from this file, a specific reading function must be called. The read function is simply a memory address that is looked up in a table. We can override which memory function we will call in a situation where a program from user space will read a record
/proc in our module - and that's exactly what we do! In structure file_operations we assign the attribute .read our function custom_read, and then register a record with it /proc. When a call to a read function comes from a user space application (the application is written in Python), it can look like you are reading a file from disk, passing all the necessary arguments onto the kernel stack, and at the last moment the function is called instead of our function for some reason custom_read, located in memory at the address that we ourselves told the kernel. This works because our function custom_read takes exactly the same arguments as when reading from disk, so the correct arguments are read from the kernel stack in the correct order.In this case, it is necessary to remember that user space applications will regard our entry as
/proc as if it were a file on disk, and it will be read and written to in exactly this way. Therefore, the burden falls on us to ensure that this interaction is respected. Our module should behave exactly like a regular file on disk, although it is not such a file. In most programming languages, reading any file usually happens in pieces. Let's say the program reads 1024 bytes at a time. You want to read the first 1024 bytes from a file and put them into a buffer, and after this operation the buffer will contain bytes 0-1023. The read operation will return 1024, thereby telling us that 1024 bytes were read successfully. The next 1024 bytes will then be read and the buffer will contain bytes 1024-2047. Sooner or later we will reach the end of our file. Maybe in the case of the last fragment we will request 1024 bytes, but only 800 bytes will remain there. So the read function will return 800 and buffer those last 800 bytes. Finally, the reading function will request the next chunk, but the contents of our file will already be read in full. Then the reading function will return 0. When this happens, the program will “understand” that the end of the file has been reached and will stop trying to read further from it.Having considered the arguments of the function we wrote
custom_read, you can see thanks to what arguments all this happens. The file structure represents the file from which our user-space application reads information (although this particular structure is actually a kernel-specific structure, which is not important for the purposes of this article). The last arguments represent the buffer, count, and offset. Here we mean a user space buffer; in principle, its contents are the address in memory where the array into which we write bytes is located. The count is the size of the fragment. The offset is the point in the file from which we start reading the fragment (as you probably already guessed). Let's look at what should happen when reading from a module. We only return “Hello world!” to user space. Counting the newline at the end of the line, we have only 13 characters here, which will fit perfectly in almost any piece of memory. When we try to read information from our record /proc, things will go like this: we read the first fragment, write the greeting to the buffer and return 13 (the length of the string with the greeting) to the user space application - after all, only 13 bytes were read. Reading the second fragment will start at offset 13, which corresponds to the “end” of our file (we have absolutely nothing else to send in response), so we will return 0. This is reflected in the logic of our function custom_read. If the offset value passed to it is greater than 0, this means that we have already received the desired greeting - so then we simply return 0, and that's it. Otherwise, we copy our hello string to the userspace buffer and update the offset value accordingly.Other functions should be built using the same principles, for example, those that override the recording function. Your function can do anything - as long as it acts as a file, any user space application can read and write to it.
Conclusion
Thank you for reading this post. I hope you found it interesting enough to inspire you to dig a little deeper into the kernel yourself. Although we used a virtual machine in this article, you will need to know how kernel modules are written if you ever plan to write code for embedded systems (such as Internet of Things devices). In that case, you should also understand kernel development better, and I especially recommend that you this tutorial. Quite a lot of books have been written on the topic of the kernel, but when purchasing, pay attention to the release date - the book should be as recent as possible. Either way, you've probably just written your first module for the Linux kernel, so you can be proud of that.

Why This Matters In Practice
Beyond the original publication, Writing our first module for the Linux kernel matters because teams need reusable decision patterns, not one-off anecdotes. The Linux kernel is perhaps the most ubiquitous (and still underappreciated) piece of software code today. All Linux distributions are based...
Operational Takeaways
- Separate core principles from context-specific details before implementation.
- Define measurable success criteria before adopting the approach.
- Validate assumptions on a small scope, then scale based on evidence.
Quick Applicability Checklist
- Can this be reproduced with your current team and constraints?
- Do you have observable signals to confirm improvement?
- What trade-off (speed, cost, complexity, risk) are you accepting?
FAQ
What is this article about in one sentence?
This article explains the core idea in practical terms and focuses on what you can apply in real work.
Who is this article for?
It is written for engineers, technical leaders, and curious readers who want a clear, implementation-focused explanation.
What should I read next?
Use the related articles below to continue with closely connected topics and concrete examples.